Showing posts with label Rimmel. Show all posts

Tuesday, February 10, 2015

Twinsie Tuesday: Anti-Valentine's Day Mani

 Love it or hate it, Valentine's Day is this Saturday. This Twinsie Tuesday, we're all falling into the "hate" camp with anti-Valentine's nails! I personally am kinda "eh" on Valentine's Day. I'm not really a candy and flowers kind o' girl. The bf and I will probably be eating dinner at Denny's (it's my favorite restaurant--yes, really) and playing video games on the couch, which is exactly how I like to spend my evenings. :)

All I could really think of for this was to do black nails, but I wanted to try something a little more interesting. I did some Iggy Azalea-style "Black Widow" nails a few weeks ago and I thought the idea of some more literal black widow nails would be perfect for an anti-Valentine's mani! Plus I love this fierce bitch...

http://www.adventuresinpoortaste.com/wp-content/uploads/2014/05/Black-Widow-6-Cover.jpg


...so win-win! I'm willing to bet Natasha is not a Valentine's Day fan. ;)

Anyways, for my nails, I used Rimmel Black Satin, OPI Over And Over A-Gwen and a black Sharpie marker to make this:


The Sharpie got a little smudged when I put topcoat on, so I tried my best to tidy it up. I doesn't look amazing, but it took me an embarrassing number of attempts to even get this looking halfway decent, so I'll take what I can get. :p


Savannah at Addicted to Polish

Róisín at Cuti-CLUE-les


Marisa at Polish Obsession


Lakeisha at Refined and Polished

Jessica at Blue Velvet Lacquer


Chelsea at Nailed Blog

Bridget at A Painted Nail

Amber at Nails Like Lace

Amanda at Fashion Footing

Amanda at Amandalandish

Alaina at The Little Canvas

Tuesday, January 27, 2015

Twinsie Tuesday: Iggy Azalea "Black Widow" Nails

This week's Twinsie Tuesday has us replicating a manicure seen on a celebrity. I really had no idea what I wanted to do for this, so I just skimmed through Google images until something grabbed me. I came across a picture of Iggy Azalea's nails in the music video for "Black Widow" and it seemed like something I might be able to do.

iggy azalea black widow

It might be a little tricky to see here, but Iggy is sporting white nails with a black dot near the cuticle bed of each nail. I used OPI My Boyfriend Scales Walls, Rimmel Black Satin and a dotting tool for my version. I did my dots a little larger than Iggy's, just as a matter of personal preference.


Other than some smudging when I went to apply topcoat (I'm always too impatient), this mani is easy enough. My dots didn't come out perfectly, but I don't claim to be a nail art aficionado by any stretch, so I'm happy with how everything came out!

Hope you enjoyed taking a look at my Iggy nails. Check out what my Twinsies did for their celeb-inspired manis this week!


Savannah at Addicted to Polish

Róisín at Cuti-CLUE-les


Marisa at Polish Obsession


Lakeisha at Refined and Polished

Jessica at Blue Velvet Lacquer


Chelsea at Nailed Blog

Bridget at A Painted Nail

Amber at Nails Like Lace

Amanda at Fashion Footing

Amanda at Amandalandish

Alaina at The Little Canvas

Monday, December 15, 2014

Brie Mode Nails

So I confessed to you guys in the latest Twinsie Tuesday post that my boyfriend and I are pro wrestling fans. Yes, it's kinda dumb and I know it's "fake," but I love the spectacle and theatricality of it. It's like a superhero cartoon come to life.

Well, tonight, we are going to our very first live WWE event--the RAW show in Detroit--and of course my nails had to be decorated for the occasion! I had a lot of ideas on what I wanted to do, but ultimately I decided to do some nails inspired by one of the WWE Divas (a.k.a. lady wrestlers), Brie Bella:


I have a lot of thoughts on how the WWE treats their women's matches (hint: it's mostly not good), which I won't bore you with here, but Brie seems like a cool chick and she's one of my favorite Divas. One of her signatures is when she's setting up a big move in the ring, she climbs on the ropes and yells out "Brie Mode," almost like she's powering up:


Trying to explain it makes me realize how dumb it sounds, but I digress. Long story short, I made some Brie Mode nails in Brie's signature colors of red, white and black. Enjoy.


My thumbs, which you can't see here, are just plain ol' Rimmel Black Satin, then my red is OPI Over And Over A-Gwen. I did the lettering with a white Sally Hansen nail striper. My bf actually took this picture for me, so a big thanks to him! The B and the R were definitely the hardest parts, especially since I had to write them with my non-dominant hand. I had to re-do the R a couple times and then it had the audacity to smear when I applied topcoat over it, but other than that, I think this came out pretty decently. 

There were a few awkward moments at work when a couple people asked what was on my nails and I'd sheepishly change the subject, because I haven't 100% embraced the whole "why yes, I'm a college-educated woman who will publicly admit to loving professional wrestling" thing.

Tuesday, November 25, 2014

Twinsie Tuesday: Manicure Suggested By Your Significant Other

I'll tell you upfront that this is probably going to be one of the most random manicures I've ever done here on Nailed. That's because my boyfriend and I tend to feed each other's weird/trashy/dorky hobbies and perhaps the best example of that, dear readers, is our shared love of professional wrestling. I know, I know, it's really stupid and basically a soap opera, but I have fond memories of watching it with my dad growing up (his favorite wrestler was Stone Cold Steve Austin) and I can't help but love the shameless spectacle and over-the-top theatricality of it all. Just because it's not real doesn't mean it's not entertaining!

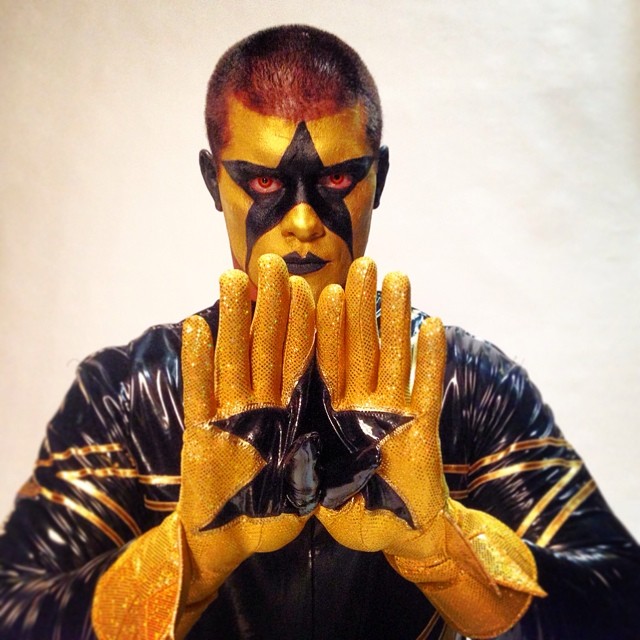
So when I told my boyfriend that this week's TT theme gave him free license to suggest whatever he wanted for my nails, the answer was pretty immediate: "Well, I'm going to have to come up with the right wrestler." I will give him credit in that he didn't just pick a wrestler at random or go with who he likes the most, but instead took some time to think about which wrestler's outfits and gimmicks might work well with nail art. He wound up choosing two of the most visually distinctive wrestlers of the WWE: the tag team of Goldust and Stardust.

http://www.ringsidecollectibles.com/blog/wp-content/uploads/2014/09/wwe-stardust-and-goldust.jpg


There are lots of directions you could take this in--I mean, look at these guys--but I think the main reason my boyfriend chose Goldust and Stardust is because he wanted to see me attempt to incorporate Stardust's gloves into my nail art design. The gloves have an interlocking design that forms a star when Stardust puts his hands together, like so:


Naturally, this mani had to have gold and black as its primary colors, so I started with a base of OPI Rollin' In Cashmere, a yellow gold, and topped it off with OPI Comet In The Sky to bring in some black, plus its iridescent glitters add some sparkle to play off Gold and Stardust's whole cosmic vibe . Then I freehanded the interlocking star design onto my thumbs using Rimmel Black Satin.


It was super weird trying to figure out how to photograph this on my own, so hopefully you get the idea of the general effect...


So yep, wrestling nails. I gotta admit, it was a fun theme to play around with and I was surprised by just how many potential manicure ideas started to pop into my head once my boyfriend told me his selection. I can't wait to see what everyone else's significant others dreamed up for them this week. I think this is gonna be such a fun theme!

​

Alaina at The Little Canvas
Amanda at Amandalandish
Amber at Nails Like Lace
Anna at Going to the Showing
Bridget at A Painted Nail
Chelsea at Nailed Blog
Cordia at Seriously Swatched
Elizabeth at Did My Nails
Jessica at Blue Velvet Lacquer
Kelly at Tuxarina
Lakeisha at Refined and Polished
​Marisa at Polish Obsession
Róisín at Cuti-CLUE-les
Stephanie at A Little Polish
Tiffany at Polished To Precision​

Tuesday, May 27, 2014

Twinsie Tuesday: Follower Requested Mani

As you may have seen on my blog or my Instagram, this week's Twinsie Tuesday had us turning to our readers for help coming up with our manis. Each Twinsie asked their followers to come up with suggestions for manicures they would like to see us try! It was super hard to pick, because I was sent some great ideas and I wish I could have found a way to incorporate them all into this mani (cheesy but true)!

In the end, I went with a suggestion I got on Instagram from @jennas_paws: a dry brush mani. I actually did a dry brush mani for a previous TT challenge and I really enjoyed playing with that technique, so I jumped at the chance to do it again! But I figured, why stop there? I was sure I could find another follower's idea to throw into the mix!

So follower and fellow Twinsie Amanda (I'm pretty sure she was the first person to follow me on Instagram, so I'm totally counting her!) also submitted the idea of creating "a mani that Oscar the Grouch's girlfriend would wear." How could I resist such a fun prompt? Also, I spent part of Memorial Day weekend reading while lounging outside on a Sesame Street beach towel--I am only two years older than this towel, true story--so that suggestion seemed weirdly on point to me, hahaha.

Now, in my mind, the grunge-y, distressed look of a dry brush mani fits perfectly with Oscar the Grouch--I mean, he lives in a trash can, after all! I tried to pick appropriate colors: silver for his trash can, black and green for Oscar himself, then bits of pink to feminize things a touch and bring the girlfriend aspect into play.


Black: Rimmel Black Satin
Silver: Sally Hansen Celeb City
Green: China Glaze Gaga For Green
Pink: OPI Hey Baby

When I finished this mani, my first thought was, "Uh...that doesn't look very pretty." I was going to re-do it, but then I thought, Oscar the Grouch's girlfriend wouldn't wear something pretty. She'd wear something that looked kinda rough and icky, because that's how she rolls.

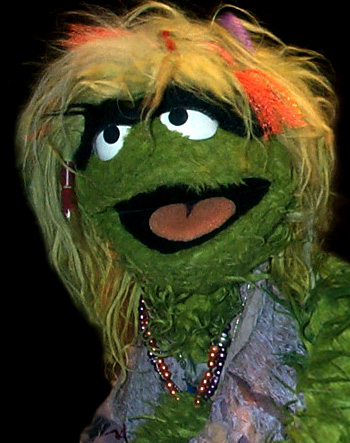
Out of curiosity, I looked up if the character of Oscar's girlfriend actually exists, and she does! Meet Grundgetta:

http://img1.wikia.nocookie.net/__cb20080901232457/muppet/images/e/ed/SsGrungetta.jpg 
 
Gotta love that unibrow! So yep, I think Grundgetta would totally rock the dirty-looking mani I created. ;)

Thank you to @jennas_paws and @amandalandish for their submissions this week! And check out what my Twinsies' followers cooked up for them to try too!

Alaina at The Little Canvas
Amanda at Amandalandish
Chelsea at Nailed Blog
Elizabeth at Did My Nails
Kelly at Tuxarina
Lakeisha at Refined and Polished
Marisa at Polish Obsession
Róisín at Cuti-CLUE-les
Stephanie at A Little Polish
Traci at DrinkCitra

Tuesday, March 4, 2014

Twinsie Tuesday: Grunge Mani

I'll admit that I totally had to Google this week's Twinsie Tuesday theme because I wasn't sure what a grunge mani was. But that's part of what TT is all about is introducing us to things we otherwise might never try or even know about, right?

If, like me, you are unfamiliar with grunge manis, how they work is that you start with a base color and then thoroughly wipe down your polish brush before streaking another color over top of it. You can layer as many colors as you like and the intent is to create a distressed or grungy look--almost like a shatter-type effect without the shatter polish. Hopefully I did an okay job of explaining that...? I feel like my description sucks but I can't think of another way to explain how you do this technique. It's easier to show than tell.

So anyways, for my grunge mani, I used Illamasqua Scorch as my white base then streaked on Spoiled by Wet N Wild Did I Dye It Too Blonde?, China Glaze Sun Of A Peach, China Glaze Pool Party and Rimmel Black Satin (which came out kinda weirdly brown-looking with this mani). I wasn't quite sure what colors to use, since this is my first time doing a grunge mani, but I knew I wanted to use some neons to really emphasize the color contrast. The color palette I used turned out to be a little 90s roller rink-esque but I am totally okay with that, hahaha.


I'm really bummed that I broke a nail Monday afternoon, forcing me to chop down my nails to nubbins, because I think this would be an especially cool-looking design on long nails. But this is the first break I've had in ages so I can't complain too much

This mani was a ton of fun to do and it's actually a super easy technique! This is one of only a few Twinsie Tuesday nail art themes that didn't involve a bunch of botched attempts and swearing on my part. I'd like to try doing another grunge mani sometime soon and I'm looking forward to seeing if my Twinsies enjoyed this challenge as much as I did!

Alaina at The Little Canvas
Amanda at Amandalandish
Chelsea at Nailed Blog
Elizabeth at Did My Nails
Kelly at Tuxarina
Lakeisha at Refined and Polished
Marisa at Polish Obsession
Rachel at Top Coat It
Róisín at Cuti-CLUE-les
Stephanie at A Little Polish
Traci at DrinkCitra

Thursday, October 31, 2013

Halloween Manicure: Nails Inspired By The Punisher

I would be hard-pressed to come up with two things more diametrically opposed than The Punisher and nail art. But I like polish and I like comics, so in my world, they kinda sorta go together.

If you're not familiar with Punisher, he was introduced in Amazing Spider-Man in 1974 and went on to star in his own series in the early 1980s. He's been in numerous series since then, from his own books to his current stint in Thunderbolts. Following the murder of his wife and children, Punisher takes to the streets as a vigilante and becomes obsessed with wiping out criminals in the most violent ways possible, including society's greatest threat: litterers.

"Give a hoot, don't pollute, bitches!"

So in honor of Marvel's trigger-happy anti-hero, I did a quick mani featuring the Punisher's skull logo. The matte topcoat smeared things a bit, so I had to do some touch-ups, but other than that, I think it turned out halfway presentable!


I started off with a white base of Illamasqua Scorch for the accent nail and then freehanded the details of the skull using a black nail art striper. The rest of my nails are Rimmel Black Satin, a.k.a. the best black ever (if you ask me, at least). Then I mattified the whole thing using Essie Matte About You, because, I dunno, the Punisher's all edgy and shit, so it seemed like the proper thing to do.

I hope you have a fun and safe Halloween today!

Tuesday, October 29, 2013

Twinsie Tuesday: Space-Inspired Manicure

"SPAAAAAAAACE!" The Portal series is a favorite of mine, so that was my first thought when I saw this week's Twinsie Tuesday theme was to do a space-inspired mani. If you've played Portal 2, I'm sure you remember the hilarious and endearingly annoying Space Core. If you haven't played the game, I'll probably do a terrible job of explaining the reference, but I'll try my best!

In the Portal series, you play as Chell, a test subject trapped in the abandoned Aperture Science labs. The only other entity that remains inside the labs is a psychotic AI named GLaDOS who is hellbent on stopping your escape from the testing center. Portal's puzzle gameplay is addicting and really makes you think, while the game's dialogue will consistently make you laugh out loud. One of the funniest characters you come across in Portal 2 is the Space Core, a corrupted AI personality core that is obsessed with traveling to space.


So I decided to have a little fun with this mani and draw the Space Core hanging out in space!


For my nail with the Space Core on it, I started with a base of Illamasqua Scorch, a white creme, then drew the lines of the Space Core using a black Sally Hansen nail art pen. His "eye" is Rainbow Honey Gilded Angel. The rest of my nails are Rimmel Black Satin with China Glaze Haunting layered over top. I was going to try and scrawl one of the Space Core's many, many space-related quotes on my thumb, but my silver Sally Hansen pen decided to crap out halfway through, so sadly I had to abandon that idea and paint over it.

I hope you enjoyed my silly little space mani today! Be sure to take a look at what my Twinsies did for their space nails today too!

Amanda at Amandalandish
Amber at Nails Like Lace
Chelsea at Nailed Blog
Cordia at Seriously Swatched
Elizabeth at Did My Nails
Kelly at Tuxarina
Lakeisha at Refined and Polished
Marisa at Polish Obsession
Meredith at Polish and Charms
Rachel at Top Coat It
Róisín at Cuti-CLUE-les
Traci at DrinkCitra

Thursday, May 16, 2013

Born Pretty Nail Art Foils: Review & Swatches


I've got another ingenious nail art product to show you from Born Pretty Store today: nail foils! These foils come in a ton of fun colors (see them all HERE) and you can use them to create colorful metallic designs on your nail. I chose version #21, which has light blue, dark blue and green. The foil comes all rolled up in a little jar for easy storage.

The foil comes in one long, multi-colored strip...

 ...that's stored in this cute little plastic tube.

A lot of foils out there require an adhesive, but Born Pretty's work by simply applying them when your polish is still slightly tacky. There is a bright side to the foil that has all the colors on it and then a dull side. You just press the foil, colorful side facing up, against your nail and rub it with your finger. Pull it off in a swift motion and it will leave a patch of foil behind. It's incredibly easy and the nice thing is that since the technique is intended to create an abstract design, you don't have to worry about where you place the foil. It'll look cool no matter what you do and the end result is really eye-catching! I got a ton of compliments and questions about this mani, which is always fun. :)

I recommend using a dark color as your base, because it will help mask any smudges. Here is a foil mani I did with Rimmel Black Satin, a glossy black creme, for my base.


The foils themselves go on really smoothly and don't leave any rough or jagged edges sticking off your nail. Once I put my topcoat on, I didn't feel any type of unusual or unpleasant texture on top of my nails; the foils blended in seamlessly. I only had to use one small rectangle of foil for each hand, so I had a ton left over. It's safe to say a single roll will last through dozens of manis. Each roll costs only $2.99 and many of them feature multiple colors all in one, so you get a lot of bang for your buck here.

Overall, I absolutely love how quick and easy these foils are to use. They take all the guesswork out of a foil transfer mani and I can't stop staring at how brilliantly bright and shiny they look on my nails!

If you'd like to purchase anything from Born Pretty Store, Nailed readers get 10% off using the code below:


Disclosure: This product was sent to me for my honest review. For more information, please see my disclosure policy.

Tuesday, April 9, 2013

Twinsie Tuesday: Rimmel Out Of Control

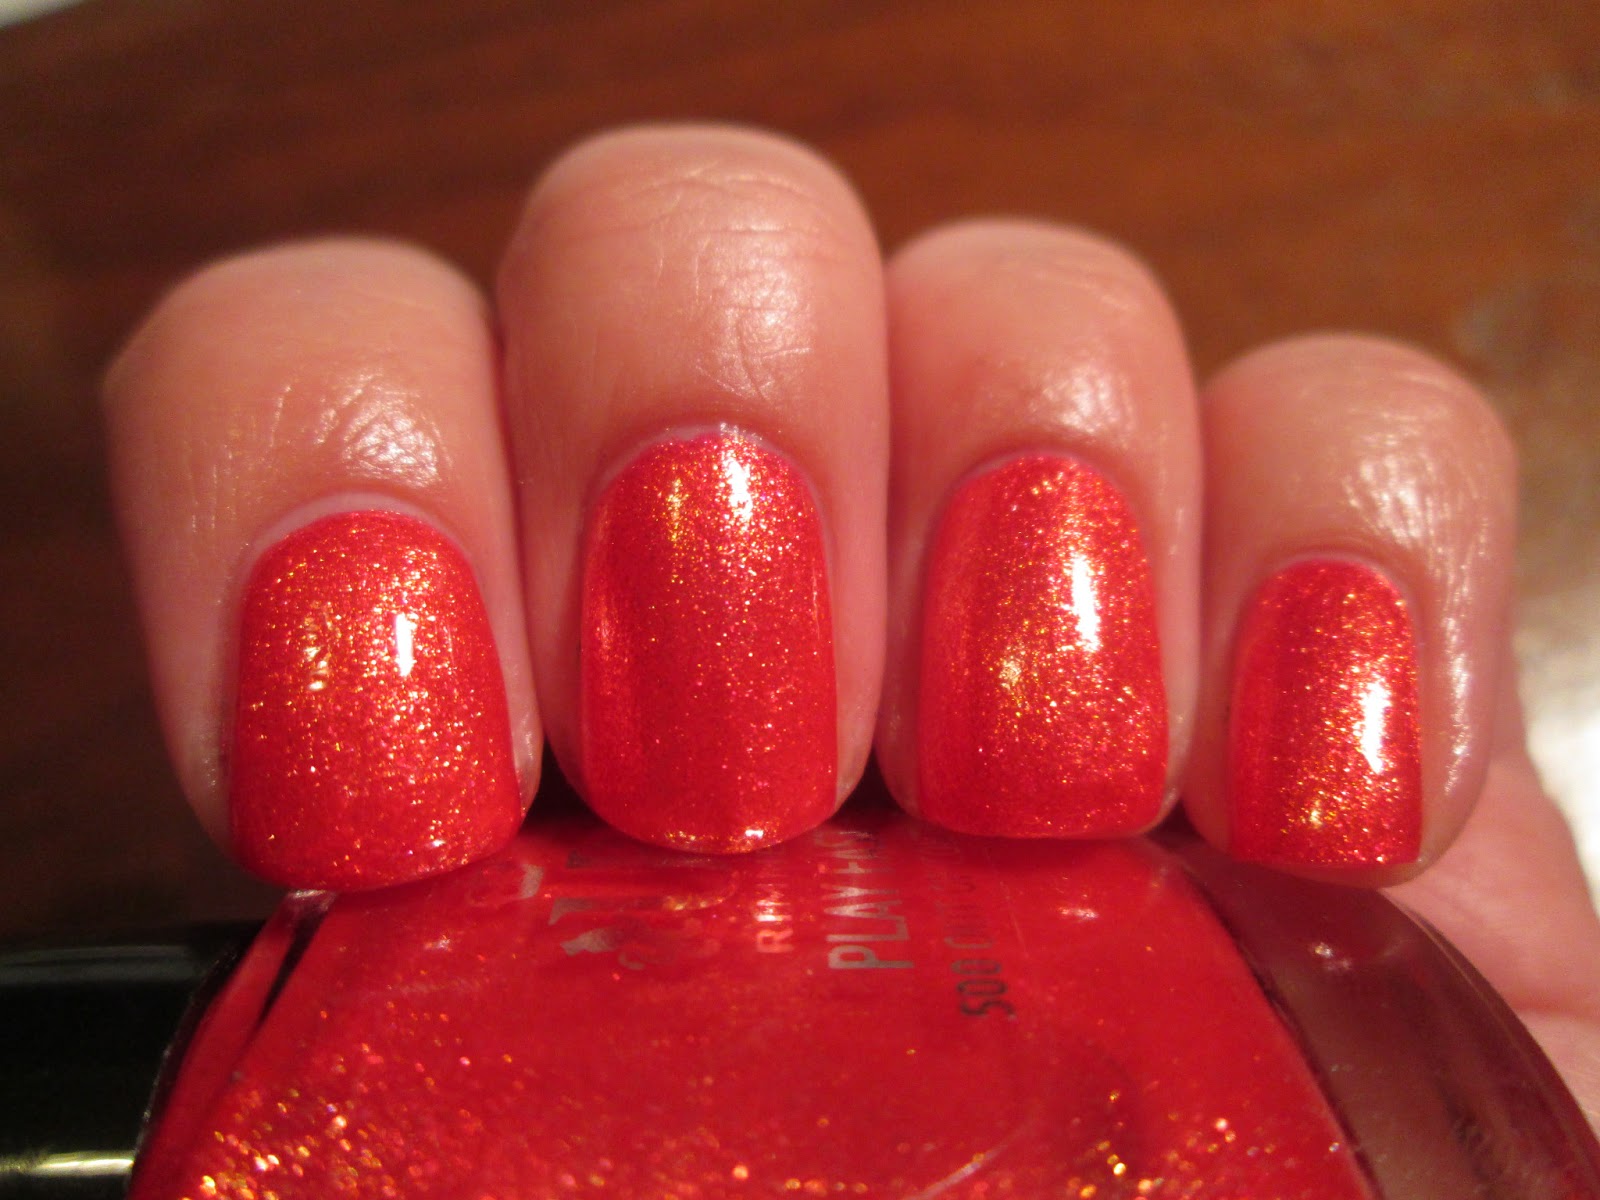
This week's Twinsie Tuesday theme is "sweet sixteen"--something you would have liked or worn at that age. The polish I chose for this theme isn't just something I would have liked at sixteen, but something I actually wore at that age: Rimmel Out Of Control. Out Of Control is one of the oldest polishes in my stash. I don't have many left from my high school days, but this is one of a handful that survived.

Out Of Control is a reddish orange packed with gold shimmer. It positively glows on the nail! I'm sure this polish was discontinued years ago but it still holds up after all these years!


The brush on the Play Fast polishes is broad and kinda square. It reminds me a bit of my least favorite brush ever: NOPI's ironically named "Perfect Stroke" brush. But other than that, I really can't complain. The shimmer and shine is totally to die for. It's so dense and vibrant that it freaked my camera out a bit. Out Of Control is a total stunner and I wish Rimmel still made it! I feel like their nail polish line has gotten a lot blander over the years, which is a shame because I have quite a few old Rimmels and they're all awesome!

How has your taste in polish changed since your high school days? Now, I definitely wear a lot more glitter (learning tricks to remove it definitely helped) and I buy from many different brands. My old (and obviously much smaller) polish collection from high school was almost all Rimmel and NYC. I'm excited to check out how my fellow Twinsies' tastes have changed too!


Amanda at Amandalandish
Anna at Going to the Showing
Anne at Grape Fizz Nails
Ashley at Art Evolve
Brandi at The Beaulieu Review
ChiChi at I'm Just Me...ChiChi
Cordia at Seriously Swatched
Elizabeth at Did My Nails
Jamie at Polish, Please!
Katherine at Haul of Fame
Maribeth at Obsessive Cosmetic Hoarders Unite!
Marisa at Polish Obsession
Meredith at Polish and Charms
Nory at Fierce Makeup and Nails
Rachel at Top Coat It
Sarah at See Sarah Swatch
Tara at Polishy of Truth

Tuesday, February 26, 2013

Twinsie Tuesday: Ruffian Manicure

I have been dreading this week's Twinsie Tuesday theme. I have never tried a ruffian mani before, mostly because I know I'd fail miserably at it. But I've developed a sense of humor about my complete ineptitude for all things nail art, so I figured it couldn't be any worse than stuff I've done before for our other TT nail art themes. (Translation: I couldn't figure out how to cheat my way out of this one.) So here we go! :)

I used OPI Goldeneye as my base and then layered my favorite black, Rimmel Black Satin, on top. I actually think this turned out pretty inoffensive, which is a hell of a lot better than I thought it would look. It's nothing special, but it's (hopefully)  not vomit-inducing either. Yay!


I think the hardest part was getting the shape of the curve right with my layering polish and then trying to replicate that same shape on the rest of my nails. I wouldn't say I accomplished that, but I actually wore this out of the house, which is more than I can say for a lot of my nail art.

I know several of my other Twinsies have mentioned already that this was not their favorite challenge either. I'm curious to see what everyone came up with though!


Amanda at Amandalandish
Anna at Going to the Showing
Anne at Grape Fizz Nails
Ashley at Art Evolve
Brandi at The Beaulieu Review
ChiChi at I'm Just Me...ChiChi
Cordia at Seriously Swatched
Elizabeth at Did My Nails
Jamie at Polish, Please!
Katherine at Haul of Fame
Maribeth at Obsessive Cosmetic Hoarders Unite!
Marisa at Polish Obsession
Meredith at Polish and Charms
Nory at Fierce Makeup and Nails
Rachel at Top Coat It
Sarah at See Sarah Swatch
Tara at Polishy of Truth

Wednesday, December 5, 2012

Mega Post: Santee, Nabi and Kleancolor

Hello all! How is your week going so far? I've been absolutely swamped this week, so I'm looking forward to having some downtime when I go visit my folks (and my doggies!) this weekend. I've got  a lot of swatch-y goodness for you today, so let's get to it!

I was recently contacted by a wholesale fashion accessories website called MyWholesaleFashion.com. They sell Santee, Nabi and Kleancolor in super bargain (like, 50 cents per bottle) wholesale packs. If you're looking to make some giftbags for girls in the office or other polish lovers in your life, this would be an awesomely affordable way to do it.


You can click on the banner above to go directly to their site, if you like. This isn't an affiliate link, just here for your convenience. :) I've got a few beauties from all three brands MWF offers to share with you today.

First we've got the Santee polishes. This is a new brand for me, but I know it's got an online following. I gave two polishes, Vikini Green and Blood, a try.

Vikini Green is a bright green creme. It has a kind of pastel hue to it, but with the brightness and intensity of neon. Hopefully that makes sense. All you need to know is that this is an awesome color, plain and simple. I love it! I'm betting my fellow green lovers out there would agree! The formula is neither too runny or too thick, but I did have to use four coats to acheive opacity and cover up any stray patches.


Blood is, as the name implies, a blood red creme. Ironically, this bottle leaked a bit in transit. My boyfriend helped me clean off some of the bottles that got "covered in Blood," so to speak, and by the end of it our hands did look like we'd been through some type of bloody ordeal. So this polish absolutely captures its inspiration! It's not the most unique color, but for what it is, it's very nice all the same. I like how bright and squishy it is! Anyone looking for a truly neutral-toned red should like Blood. This is two coats.


Next up is Nabi! I think it's time for a little glitter in this post, don't you?

Pink Moon Star is a tinted pink base filled with round, star and moon-shaped holographic silver glitter. This is such a cute polish! It's pretty sheer, so I layered two coats over Essie Mod Squad.


Fruit Green is an avacado-y green. This shade might be a touch too yellow-based for yours truly, but I still really like it. It's very bright and makes me think of summer. I used three coats here.


Dark Green is...well, pretty self-explanatory. It has a bit of a blue lean to it, like a darker version of Essie Going Incognito. The formula is fabulous and covers in just one coat.


Last but certainly not least is Kleancolor!

I've heard a lot about the Kleancolor chunky holo polishes and was dying to check them out for myself. I'm happy to say that I think they totally live up to the hype! If you are a fan of color shifting polishes, then you will die over Chunky Holo Black. This is a ridiculously amazing polish! It's a tinted black base willed with color shifting hexes that change nearly every color of the rainbow. I absolutely love it! Chunky Holo Black was definitely one of my favorites of all the My Wholesale Fashion polishes I tried. This is two coats over Rimmel Black Satin.


 I just had to include a bottle shot for this polish. It's so mesmerizing...

The other chunky holo polish I tried was Chunky Holo Teal. It doesn't quite have the same eye-melting rainbow goodness as Chunky Holo Black, but it's still a stunning mix of iridescent flakies in a teal tinted base. It reminds me of when you see sunlight flickering across water. This is two coats over Butter London Slapper.


Kleancolor also makes some amazing glitters and Firework has been another longtime lemming of mine. It's a mix of yellow round glitter with yellow, red and blue hexes. I layered one coat over Rimmel Black Satin here. This is such a fun mix of colors and I love how they pop over black.


Metallic Mango is a lovely bronze foil. There seems to be a bit of fine silver microshimmer in this polish too, which gives it some added depth and gleam. It reminds me of China Glaze Harvest Moon, which is always a good thing in my book! This is two coats.


Shooting Star is like a cool-toned version of  Firework. It has silver round glitter in place of Firework's yellow round glitter. Both polishes are very pretty though and I could see glitter lovers giving both a place in their collections. This is one coat over Metallic Mango.


Afternoon Picnic is a rainbow mix of medium-sized hex glitters and large silver hexes in a clear base. This polish is like a fun twist on Deborah Lippmann Happy Birthday (and its millions of variants). I really like the variety the large hexes add, but they are a bit of a pain to place. They tended to want to group together on the nail, so I had to spread them out. This is two coats over Essie Sweet Talker.


Lavenbaby is a pastel purple creme. This polish made me wonder why I don't have more pastel purples in my collection. They are so cute! It's not too red-based or blue-based, so it should flatter just about any skintone. This is three coats.


Which of these polishes is your favorite? I'd have a hard time picking, but I definitely love Chunky Holo Blac, Chunky Holo Teal, Vikini Green and Firework a lot.

Disclosure: These polishes were provided to me for my honest review. For more information, please see my disclosure policy.