Tuesday, March 31, 2015

Twinsie Tuesday: OPI La Boheme

Today we're sharing our favorite discontinued polishes. I always have a hard time playing favorites, so these types of themes are kinda tough for me. But this time, I went with one of the crown jewels of my polish collection: OPI La Boheme! This vampy burgundy shimmer came out way back in 2003 as part of the Holiday on Broadway Collection and has since achieved something of a cult status among collectors. The whole collection was crazy awesome--another shade from it, Movin' Out, was a close runner-up for me this week.

I have never seen a shimmer as glowing and alive as the one in La Boheme. It's seriously unreal how sparkly and vibrant it is! Plus there are some stunning hints of orange duochrome to make this polish even more complex. Pictures absolutely fail to do it any justice. You have to see it dancing in the light before your eyes to really get how beautiful and special this red is! Alright, enough raving, let's see it, shall we?!


I couldn't help but include this swatch from my original post on La Boheme, since I feel like it shows off the duochrome in this polish so nicely!


That picture makes me really miss my old swatch lamp. It was fantastic for duochromes--something my current lamp can't seem to ever capture as well. Is that weird, missing a lamp? Anywho...

My bottle could definitely benefit from some thinner. It's an older polish, plus the bottle is a little more than halfway empty, so it's getting kinda gloppy. I'm fresh out of thinner at the moment though, so I had to struggle through--thankfully this gorgeous red is more than worth the extra effort! ;) This is two coats.

For more discontinued beauties, check out my Twinsies' blogs below!


Alaina at The Little Canvas

Amanda at Amandalandish
Amanda at Fashion Footing
Amber at Nails Like Lace
Bridget at A Painted Nail
Chelsea at Nailed Blog

Jessica at Blue Velvet Lacquer
Lakeisha at Refined and Polished

Marisa at Polish Obsession
Róisín at Cuti-CLUE-les
Savannah at Addicted to Polish

Monday, March 30, 2015

OPI I Vant To Be A-Lone Star

I'm sporting an oldie but a goodie today: OPI I Vant To Be A-Lone Star, from the Texas Collection. This pale icy blue with silver shimmer was a favorite of mine when that collection came out back in 2011. I swear I remember it as being more blue, but hey, it's still lovely. ;)


Pretty good formula on this one--a smidge thin, but that's more personal preference than anything else. I used three coats here.

It's fun to go perusing through your own stash every now and again, whether it's to bust out an old favorite or maybe discover an untried or other hidden gem you'd forgotten about.

Saturday, March 28, 2015

La Femme Holografico Unica

So I don't 100% remember when I bought this polish (I assume I got it off Llarowe), but even without knowing that, I can tell you without a doubt why I bought it: it's a forest green linear holo! I've been on the search for the perfect deep green holo for a while now, so I'm sure that's why I picked this one up. I gotta admit, I was a little bummed about this shade, because when it was wet, the holo looked crazy intense and it doesn't look the same way after it dries. It's still decently visible, but the darker base color makes it harder for the holo to come through, especially in lower/indoor lighting. It comes alive pretty nicely in the sunlight though!

Indoors:
Outdoors:


The formula is right up there with the best holos I've tried, like a-england and Color Club. It's buttery smooth and doesn't streak or drag. What you see above is just two coats of Unica--no base or top coat.

Although the holo may not have turned out as prevalent as I would like, I still dig this polish. The base color is super pretty--it is green, after all!

Thursday, March 26, 2015

Lumina Lacquer Social Meteor

Lumina Lacquer Social Meteor is a clear-based glitterbomb with grey, baby pink and pastel yellow in a variety of shapes, like circles, crescent moons, stars, hearts and hexes. These are colors you wouldn't necessarily think to put together, but I love the combination and all the different shapes are super fun!


The formula is just okay. I had to fish a lot to get the larger glitter pieces on my brush (seems like they tended to sink toward the bottom of the bottle) and it took some extra guidance to make the glitter distribute the way I wanted it to on the nail. Dabbling and placing are ideal application strategies here. What you see above is two coats of Social Meteor over Deborah Lippmann Chasing Pavements.

While the formula was alright, I still fell in love with the look of this polish. It's so cute and the pops of pastel are very pretty and feminine-looking. I had my eye on this polish for a long time before I finally pulled the trigger and I'm definitely glad I indulged!

You can purchase Lumina Lacquer from their website.

Tuesday, March 24, 2015

First Look: China Glaze The Great Outdoors

So the size of the pictures isn't the best and we don't have any shade names, but I thought I'd share this little glimpse of what China Glaze has in store for us this fall! This isn't anything official, so there might be some changes in the works between now and then, but I'm liking what I see so far!


I'll post more info as soon as I come across it. Stay tuned, lovelies!

Twinsie Tuesday: Manicure Idea From Pinterest

Hey all. I'm visiting my folks for a few days and I forgot to bring any polish along with me. So no post for me today. :(

However, to try and make it up to you, I offer up this photo of one of my Corgis chillin' with an Avengers blanket. I'm looking forward to relaxing today with this little gremlin and her brother.


I'm sorry to have to sit things out this week, but be sure to check out what my Twinsies did for their Pinterest-inspired manis!


Savannah at Addicted to Polish
Róisín at Cuti-CLUE-les
Marisa at Polish Obsession
Lakeisha at Refined and Polished
Jessica at Blue Velvet Lacquer

Chelsea at Nailed Blog

Bridget at A Painted Nail

Amber at Nails Like Lace
Amanda at Fashion Footing
Amanda at Amandalandish
Alaina at The Little Canvas

Monday, March 23, 2015

China Glaze Electric Nights Update

Just a quick heads-up that I've updated my post about China Glaze's summer collection, Electric Nights, with a full list of bottle shots and we now know which colors are which! So if you want to learn more about the collection, you can see all of that info and more by clicking HERE. Enjoy, lovelies! :)

Sunday, March 22, 2015

Review: No-Rub Power Gel Polish Remover For Stubborn Dark Polish & Nail Art/Glitter

So I'm super lazy and hate having to scrub my nails to get polish off. We all know glitters can be a bitch to get off, but I even have trouble with really dense shimmers. So the idea of a gel where I can just put it on and then wipe my polish off is something I'm all about. It seems like this stuff is all the rage in the polish community right now and I had to try it for myself! Sounds awesome, but does it actually work? Let's find out!

There are two formulas of this gel available: one for glitter/nail art and one for dark polish.


The whole thing sounds like a gimmick-y idea but I was curious. Thankfully, they only set me back three bucks and some change each at Walmart, so I wasn't gonna be devastated if I didn't like it. If you don't have a Walmart in your area, it's also available online via No-Rub's website, but the price is twice as much--still not super expensive though.

To use the gel, dip your fingers in one at a time. (You can, however, have the remover soaking on all five fingers at once. You don't want to dip them all at once, though--if that makes sense.) The gel is thick but still prone to dripping, so you'll want to have some sort of drop cloth handy and make sure you keep your fingers away from furniture, clothes, etc. while the gel soaks. I experienced a noticeable cooling sensation when I had the gel on my nails, but it was not uncomfortable or irritating at all. I've read other reviews that said the cooling sensation was painful or made their fingers feel numb, so keep in mind that some people appear to be sensitive to this gel.

Let it set for 45 seconds to a minute for the dark polish formula or 4 minutes for the glitter one. The polish will start to bubble up and sort of break down. I took this picture really quick, so it's not the best example, but hopefully you get the idea.


The directions recommend removing the polish using a paper towel, and while that works fine, I've found a piece of felt is the easiest and the least messy. But DON'T use cotton balls or cotton pads--they get all gummed up and messy. To remove the polish, simply press down on your nail with a folded piece of paper towel or a piece of felt and then wipe away.

I sometimes had some extra polish left over right around the edge of nail bed, especially when removing glitter, so I had to go back and clean that up with some regular polish remover. However, I never experienced any staining, even with darker polish.

I've tested both formulas and I can't see much of a difference between the two, other than the glitter gel is pink. But perhaps the glitter one is more potent? Either way, they work equally well and other than the difference in soaking time, usage instructions for each are the exact same. 

One con I wanted point out is that you will NEED to wash your hands with soap and water after this, as the gel leaves a little bit of a sticky residue behind. I normally rinse my hands with just water after using traditional remover, but that wasn't enough to get the slimy feeling from the gel off. It was just fine after some soap though.

Other than that, I was very impressed with how well these gels worked! Cleaning the gel off your hands afterwards can be a little messy, but I still loved how easy it was to remove polish. It's quick and easy, with no scrubbing whatsoever and no prepping necessary--just dip, wait and wipe away. Really cool stuff!

 Have you tried either of these removers yet? I'd love to hear how they worked for you!

Thursday, March 19, 2015

Deborah Lippmann Champagne Supernova

Deborah Lippmann Champagne Supernova is a lightly tinted champagne base absolutely packed with chunky silver holo glitter. I know these super dense, chunky glitters aren't a favorite with everyone, but I can't get enough of them!


Unfortunately, the formula on this one is a hot mess. I dunno if it's because I got a mini bottle, but this sucker is thick--like, needs-thinner-every-time-I-use-it thick. Even with a dabble method of application, it was hard to get the glitter pieces to go exactly where I wanted them to, because the consistency of Champagne Supernova was so unworkable. I used three coats here.

So yeah, a really cool polish with a pretty crappy formula. If any of you have a full-size bottle of Champagne Supernova, I'd be very curious to hear if it has the same issues as my mini one did. Any polishes in your collection with a look you love but a formula you hate?

Wednesday, March 18, 2015

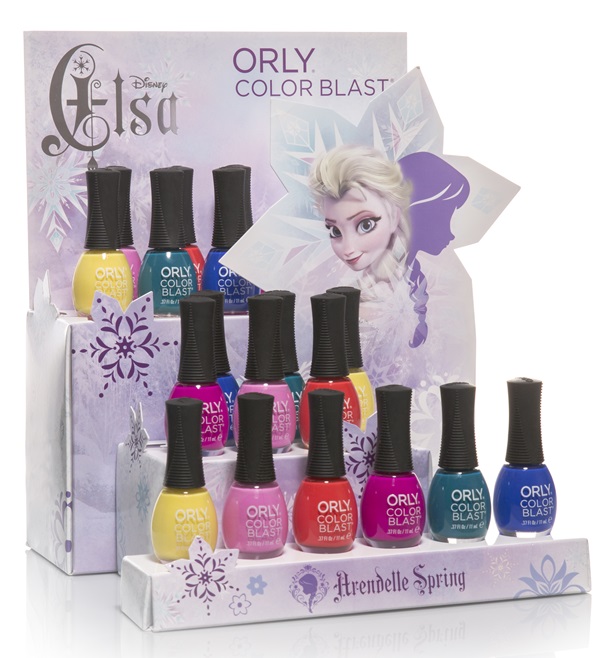
Orly Color Blast Elsa (From Disney's Frozen) Collection Preview

I feel like one of the few people remaining in America who hasn't seen Frozen. However, I am more than familiar with its merchandise, which seems to be EVERYWHERE. Now Orly is throwing its hat into the ring with a Frozen collection of their own.

The collection, available exclusively at Walgreens, is apparently going to be the first of several Disney-themed collaborations for Orly's Color Blast line this year. The Color Blast bottles are smaller (0.37 oz) and retail for $6.99 each. Seeing as full-sized Orly bottles retail for about eight bucks, that price isn't exactly a deal, but there will also be some duo packs in this collection for $10.99, which is slightly more economical.

The polishes are already popping up at Walgreens nationwide, so if you haven't seen them already, here's what to be on the lookout for:

https://blogger.googleusercontent.com/img/b/R29vZ2xl/AVvXsEh7wPNwFC7IgcUEg66obHvRff1TG2cGysY4r0xp4HwNmZ0mKkIpUHjQ8GVcDfvKQtYwnQq-Uo46AhOkrCgNHtZApsJjteIOU4zKbLbQxA1nKJNrEOMMzMofPu8ex64xzzx8gum3xcYiL4_j/s1600/ColorBlast_DisneyFrozen_SnowQueen_18pcDisplay.jpg

frozen orly color blast nail polish 
Top row, L to R: Free Spirit, Kristoff He Goes, A Happy...Puddle
Second row, L to R: Ice-solated, Coronation Ball, Frozen
Third row, L to R: Watch Out Or Elsa!, Winter Blush, Snow Queen
Fourth row, L to R: In Summer, Olaf You A Lot, Warm Hugs

The batch of colors shown on the second display seem to fit what I know of the movie's aesthetic much better than the first set of shades. Still, there are some cute colors here. I'm not sure if I'll be a buyer since the price is high for smaller bottles (especially considering that these aren't crazy holos or glitters, where we're used to seeing higher price points) but I'm intrigued to see what else this year-long collaboration will have in store for us!

Frozen fans: Do you like what you see here? Do the colors capture the look and characters from the movie?

Tuesday, March 17, 2015

Twinsie Tuesday: St Patrick's Day Nails

I've got a lot of Irish heritage, but I must admit: St. Patrick's Day isn't a favorite holiday of mine. I'm not huge into drinking or crowds, so it's just not for me. But I still like to get into the spirit as best I can with some St. Paddy's nails, which also happens to be our Twinsie Tuesday theme this week!

I wanted to do something kinda funky for my green, so I chose Essie The More The Merrier, a slightly swampy lime green. Then to top it off, I used OPI When Monkeys Fly! You might remember this as a, I guess you could say, controversial polish when it first came out. A lot of people had taco glitter trouble with this polish, but my bottle didn't give me any issues. I thought the gold glitter hexes in it looked like coins from a pot of gold at the end of a rainbow. :)


I wasn't 100% sure I'd like these two together, but they actually make for a fun pairing. I like that it's a bit different than what you would normally think of for St. Paddy's nails, yet it still fits into the classic holiday color scheme.

So there you have it: my take on green and gold for today's festivities! Have a safe St. Patrick's Day, everyone and remember: NEVER drink and drive. I know it's something we hear all the time but i figure another reminder can't hurt. <3 Have fun and rock some fierce nails today!


Alaina at The Little Canvas
Amanda at Amandalandish
Amanda at Fashion Footing
Amber at Nails Like Lace
Bridget at A Painted Nail
Chelsea at Nailed Blog

Jessica at Blue Velvet Lacquer

Lakeisha at Refined and Polished
Marisa at Polish Obsession
Róisín at Cuti-CLUE-les
Savannah at Addicted to Polish

Sunday, March 15, 2015

Essie Blossom Dandy

I came across the Essie spring collection yesterday! It's a pretty set of colors, but the only one that really screamed "BUY ME!" was Blossom Dandy. I think it's the most unique of the bunch. Blossom Dandy is a cool-toned pastel blue with a nice hint of mint to it.

Outdoors:


Basking in the direct sunlight: 

LOVE. THIS. COLOR. It's beyond gorgeous, guys. This was a instant shoe-in for one of my all-time favorite Essie's! The color is so stinkin' cute and absolutely perfect for spring. It's pastel and it manages to be sort of both blue AND green, so this polish is just hitting all my buttons.

The formula is pretty good. By pastel standards, it's really not all that streaky. However, I did find it doesn't self-level especially well, but it was nothing a little top coat couldn't fix. I used three coats here.

To me, this is the hands-down standout from all of Essie's spring collections. Just Stitched from Cashmere Matte is my second favorite, but Blossom Dandy is just freakin' perfect.

Thursday, March 12, 2015

Butter London Chuffed

The sun is finally shining here these last few days, so I was in the mood for something fun and colorful on my nails. Enter Butter London Chuffed, a gleaming orange with iridescent gold-green shimmer. With its dense golden shimmer, it's the perfect polish to celebrate the sunshine with!


The color shift in the shimmer is very slight. I catch a fleeting glimpse of the green here and there (mostly with low, indoor lighting) but for the most part, it's gold--and that's not a bad thing, because the shimmer in this polish is AMAZING. Seriously, well done, Butter! I can't remember the last time I was so smitten with a shimmer polish!

Chuffed has a nice, workable consistency but it does go on sheer at first. If you don't share my rabid hatred for VNL, three coats should suffice. I used four here.

Wednesday, March 11, 2015

Essie Wrap Me Up

Let's continue our journey through Essie's Cashmere Matte Collection today with Wrap Me Up, a porcelain nude satin. This was one of the shades I was most looking forward to. I love me some off-whites and the satin finish of Wrap Me Up makes for absolutely perfect china doll nails!


The formula on Wrap Me Up was okay. It doesn't have the drag that Comfy In Cashmere does, but it is the streakiest of the Cashmere Mattes. It took me four coats to get full, even opacity. I also found it interesting that while the rest of the Cashmere Mattes have worn quite well on me (especially when you consider that I wear them without topcoat), Wrap Me Up chipped quickly. After less than a day of wear, I had a large chip on my right index finger and even when I wore it with topcoat, it still continued to chip consistently.

With topcoat, this one doesn't have the shimmer to it that the other Cashmere Mattes do; it looks more like a creme than anything else. If you're curious, you can see a pic of it with topcoat in yesterday's Twinsie Tuesday post. It's a great blank canvas shade to either wear alone or use as a base for glitter and other goodies!

Tuesday, March 10, 2015

Twinsie Tuesday: Soft And Feminine

Sorry I'm late, guys! I haven't been feeling too well since last night, so my blogging plans fell by the wayside. But I did still try to whip up a lil' something that fit our theme of "soft and feminine." When all else fails, you can always slap some glitter on top and call it good--words to live by! Here's what I was able to muster:


I stuck with a nice, clean neutral base (Essie Wrap Me Up), then threw in a dash of white and pastel pink glitter (OPI Let's Do Anything We Want!) to try and girly things up. Again, nothing extraordinary but I do think it makes for a cute combo and it's pretty dainty-looking, which I think fits the bill well enough for this theme. :)


Savannah at Addicted to Polish
Róisín at Cuti-CLUE-les
Marisa at Polish Obsession
Lakeisha at Refined and Polished

Jessica at Blue Velvet Lacquer

Chelsea at Nailed Blog
Bridget at A Painted Nail
Amber at Nails Like Lace
Amanda at Fashion Footing
Amanda at Amandalandish
Alaina at The Little Canvas

Friday, March 6, 2015

Lumina Lacquer All Tied Up

Lumina Lacquer All Tied Up is a pink, purple and white explosion of circle and hex glitters. Usually the mere presence of circle glitter (let alone holographic circle glitter, as is the case with All Tied Up) is enough to earn my stamp of approval, but what's really magical about All Tied Up is the inclusion of bow-shaped glitters!


All Tied Up was originally a holiday polish from Lumina, but with the right base, I think it makes an awesome spring glitter topper too! My choice here was Deborah Lippmann Build Me Up Buttercup. I was tempted to use a baby pink creme, but I thought the pastel yellow gave the glitters more of a chance to pop.

All Tied Up was a little tricky to apply. It took some maneuvering to keep the glitters from bunching all together. The dabbling method of application is your best bet to ensure even distribution across the nail. I used two coats here.

All Tied Up is a discontinued polish (sorry y'all), but there are plenty of other goodies to be found at Lumina Lacquer's website.

Wednesday, March 4, 2015

Review: Nail Pattern Boldness Glitter Food

We all have it: somewhere, in our vast hordes of cremes, shimmers and sparkles, that one glitter polish that hasn't stood the test of time. Whether it's gotten all gummed up or the glitter has sunk to the bottom of the base, for one reason or another, it's just not what it used to be. I was really bummed when I went to wear one of my favorite indie glitters a while back and found it had changed for the worse. The glitter had sunk to the bottom and the suspension base was super thick and gunky. Maybe I didn't seal this polish up well enough or maybe it just didn't hold up--either way, it was completely flat and virtually unusable.


I tried to salvage it with polish thinner (PSA: DO NOT use polish remover to thin a polish--all you'll do is damage your polish) and even after putting an insane amount of thinner, there was no visible difference. The base had gotten so thick that the metal mixing balls inside couldn't move and help disperse the thinner throughout the bottle.

I have a couple sunken down glitters (none near as bad as this one) I've been meaning to try and fix anyways, so I figured the time was right to try Nail Pattern Boldness Glitter Food. I'm a huge fan of their Glitter A-Peel peel-off basecoat for glitter manis and I've always wanted to try Glitter Food after hearing so many positive things about it.


Glitter Food is a two-in-one product. Its first purpose--and the one that interested me the most--is that it can help save glitters experiencing any of the issues I mentioned above. When you have a polish where the original suspension base used was not strong enough to hold up the glitter (this is more common with polishes that have larger glitter pieces), Glitter Food gives it an extra boost to help the polish look and apply the way it should.

I tried it on a couple of my sunken glitters and it worked exactly as described! If you have a bottle that is nearly full or a bottle where the clear base has completely separated from the glitter, you might need to suck out some of the old suspension base with an eyedropper and then replace it with Glitter Food. It takes a little shaking up and then a few minutes to let Glitter Food do its magic (I usually turn the bottle upside-down while it sits), then you've got a glitter polish that looks good as new! Your big glitter pieces float back up to the top of the bottle and everything is distributed nice and evenly!

So it worked with mild cases, but could it save my poor pink glitter? This bottle was so flat, that no eyedropper was needed; I just poured some Glitter Food straight in. After lots of shaking and giving Glitter Food a few minutes to settle in, I used an orange stick to stir the glitter around a bit and let the Glitter Food penetrate deeper into the bottle. After a few more minutes, here's how it looked:


 Ta-da! I have my polish back!! It looks and applies wonderfully and you'd never guess that just a few minutes before, it looked like this polish was done for. If Glitter Food can salvage this worst-case scenario, I'm confident in recommending it as a fix for virtually any glitter polish problem!

Those results alone were worth the price of Glitter Food for me. But as I said earlier, that's not all Glitter Food does! It can also be used for smoothing out "hungry" glitters that eat topcoat and leave a rough or gritty finish. You'll find it's thicker than most top coats, but that's what makes it so smoothing. I also want to note that on its own, Glitter Food has a semi-matte finish to it, so you'll need to use regular topcoat over Glitter Food if you want some shine.

 So there you have it: another genius, innovative product from Nail Pattern Boldness! I hear NPB makes a fantastic base and top coat system as well, so that's next on my list to try. But it's going to take a lot to dethrone my current fav, Deborah Lippmann Gel Lab!

You can purchase Glitter Food from Nail Pattern Boldness' website.

Tuesday, March 3, 2015

Twinsie Tuesday: Endometriosis Awareness Nails

Endometriosis is a hormonal and immune system disease in which cell grows outside the uterine cavity, causing extreme pain and infertility. This female reproductive disease affects approximately 1 in 10 women worldwide. Today, the Twinsie Tuesday girls are wearing yellow to bring awareness to this debilitating disease.

I chose a pastel yellow creme, Deborah Lippmann Build Me Up Buttercup. When you're as pale and as blonde as I am, you have to be careful with yellows, but I can usually do okay with pastel ones like this.


The formula is pretty decent--certainly world better than the other DL yellow I own, Yellow Brick Road. It goes on a little streaky (still, show me a pastel yellow that doesn't) but it's not chalky in the slightest. I used three coats here.

Alaina at The Little Canvas

Amanda at Amandalandish

Amanda at Fashion Footing

Amber at Nails Like Lace

Bridget at A Painted Nail

Chelsea at Nailed


Jessica at Blue Velvet Lacquer


Marisa at Polish Obsession

Savannah at Addicted to Polish

Róisín at Cuti-CLUE-les