Thursday, May 31, 2012

Comparison: Essie Mojito Madness Vs. Essie Pretty Edgy Vs. China Glaze Starboard

A few readers requested a comparison between Essie Mojito Madness, China Glaze Starboard and Essie Pretty Edgy, so here it is!


In the bottle, Mojito Madness and Starboard look eerily similar, but Pretty Edgy is already visibly darker. On the nail however, Starboard and Mojito Madness look very different. In fact, Pretty Edgy and Starboard wound up being much closer to each other than either was to Mojito Madness!

L to R: Essie Mojito Madness, China Glaze Starboard, Essie Pretty Edgy, Essie Mojito Madness

As you can see, Mojito Madness is much brighter and lighter than both Starboard and Pretty Edgy. No dupes here! As for Starboard and Pretty Edgy though, they are really close. They are not 100% dupes--Pretty Edgy is just a smidge darker than Starboard and the green is a touch more saturated--but I'd say they're about 98% identical. Unless you're a green fanatic, you don't need both because they are incredibly similar.


Formula-wise, I'd say China Glaze was the best, although they're all comprable. This was two coats of each polish. If you already have either Starboard or Pretty Edgy, you're safe getting Mojito Madness. It's easily the brightest of the trio and a very different type of green than the other two.

Review: Deborah Lippmann The Stripper To Go

My recent Deborah Lippmann order came with a free sample of The Stripper To Go, a nail polish remover mitt. I'd never tried this product before so I thought it might be fun to share my experience with you all. Will The Stripper To Go become my new private dancer or is she just another pretty face? Let's find out!

The mitt comes in a little sealed package that makes it easy to take this with you on the go or to pop in your luggage for trips.


The packaging claims one mitt is enough to remove an entire manicure, so I thought I'd use this to try and take off my Essie Bikini So Teeny manicure. (Strippers removing bikinis... This has become a raunchy little post, hasn't it?) Gotta love the name and the "for go-go girls" tag!


Once you take the mitt out, it looks like this:


The mitt has a lavender scent to it, which isn't one of my favorite scents, but I'll admit it smells better than regular remover. I wrapped it around my right index finger and then kept it pressed into my nail for about two minutes to see if it would soak up the polish and I was less than impressed with the results. It only took off about half my polish and my nail was covered in little fibers.


I probably could have already completely removed this entire manicure using traditional polish remover and cotton balls in the two minutes it took for The Stripper To Go to do half a nail. *Queue trombone* Wah waahhhh.


But I decided to give it another shot using the same method on my right thumb and this time the results were even worse. It felt like the mitt was starting to dry out a bit. The polish had not been removed at all, only slightly dimpled, and the stringy fibers were everywhere again. It looked like I'd been petting a Persian cat, not trying to take off my nail polish.


I tried scrubbing off polish with the mitt rather than pressing down against the nail and that worked better than just putting my fingers into the mitt, but still not as well as just a good ol' cotton ball. After scrubbing the polish off three nails, I just gave up and removed this polish the old-fashioned way.  Overall I found the whole Stripper process unnecessarily long and less convenient than traditional polish removal.


I really love the idea of these mitts and I wanted to love the product itself since I think they'd be great for trips, but sadly the execution was a big fat FAIL for me. These are also on the pricey side--$12 for a pack of six mitts--and frankly I don't think they're worth that much. However, I've read some rave reviews for this product so I guess your mileage may vary. But yours truly is one disappointed go-go girl!

Tuesday, May 29, 2012

Butter London Autumn/Winter 2012 Preview

Butter London is one of my all-time favorite brands so I'm always thrilled when they unveil new polishes. I'm still gradually compiling the polishes from their spring collection as my wallet allows, but I'm eager to have some new Butter's to lust after! Ready to sneak a peek at the upcoming Butter London autumn/winter collection? Below are all five shades, plus the official descriptions!

Lovely Jubbly: A fusion of gold, red and blue sparkles set in magenta.


Gobsmacked: Heavy charcoal with a slightly pigmented finish.


Trustafarian: Sage green flecked with gold.


Shag: An orange burgundy fusion that's all things autumnal.


Dodgy Barnett: A grey/silver hybrid.


I'll be waiting for swatches to decide which ones I need in my life (Hint: It will probably be several!) but I can already tell you that Trustafarian is on my must list!

 
What about you? See anything that's grabbed your attention?

Monday, May 28, 2012

Twinsie Tuesday: Glitter Gal Lizard Belly

This week's Twinsie Tuesday themes features one of my very favorite types of polishes: holographic! I thought I'd bust out a very, very special polish for this post: Glitter Gal Lizard Belly, a deep green linear holo. It's green, it's holographic, it's a no-brainer: Obviously I love this! Be forewarned, this post is very pic-heavy; I couldn't help myself! I suggest clicking to enlarge for these babies. (Also, in addition to the polish, just look at the bottle! It's jaw-droppingly gorgeous!)


Outdoors:


Indoors, with flash:


And then some gratuitous bottle shots:


Pictures do this polish zero justice. It catches the light like nuts, so the fact that it's so reflective made it a little tough to photograph and truly capture how vivid the holographic effect is in real-life. Lizard Belly is crazy gorgeous! When the little rainbows peek through the dark base, it's like this polish is practically pulsating with light from within.


The formula is pretty good. It's a touch difficult to spread, but I think that may be because I didn't use a special basecoat, just my regular Essie Feed Me. I don't feel a special basecoat is essential for this polish, but it might make things a bit easier. I used two coats for this mani and no topcoat, because I didn't want to risk dimming the holographic effect one bit!

The only downside to this stunning polish is the price: $14 for 0.3 oz. Hence the reason I only have one Glitter Gal polish. But I absolutely love it to pieces! If you're a holo lover, this is an absolute must-have. Glitter Gal is an Australian brand but I bought mine from Llarowe.


Craving more holo goodness? Check out the other Twinsie Tuesday blogs!


Amanda: http://amandalandish.blogspot.com/
Anna: http://goingtotheshowing.blogspot.com/
Anne: http://grapefizz.blogspot.com/
Ashley: http://artevolve.blogspot.com/
Brandi: http://thecollegiatenail.blogspot.com/
ChiChi: http://beautystarr1009.blogspot.com/
Cordia: http://srslyswatched.blogspot.com
Jenn: http://allthatisgorgeous.blogspot.com/
Jenna: http://www.jennafroggy.com/
Katherine: http://hauloffame.blogspot.com/
Marisa: http://marijonails.blogspot.com/
Meredith: http://polishandcharms.blogspot.com/
Nory: http://fiercemakeupandnails.blogspot.com/
Rachel: http://topcoatit.com/
Sarah: http://seesarahswatch.blogspot.com/
Tara: http://polishyoftruth.com/

China Glaze Snow Globe

I fully recognize the irony of featuring a polish called Snow Globe when it’s pushing 90 degrees outside. But hey, I was in the mood for something sparkly! China Glaze Snow Globe has been around for a while, but it was recently re-released last holiday season with the Let It Snow Collection, so you can still find it easily online at places like Victoria’s Nail Supply. Snow Globe has a clear base chock-full of iridescent glitter in various shapes and sizes. I paired it with Essie Sweet Talker, a pastel blue shimmer.


And then a shot of the bottle, just because it's so pretty:


Snow Globe is somewhat similar to Butter London Tart With A Heart, but Tart With A Heart has specks of black glitter in it which are absent in Snow Globe and Snow Globe has more big hex pieces of glitter than Tart With A Heart. To my eye, Snow Globe also appears much more iridescent, perhaps because of those larger glitter pieces.

This is a beautiful polish. Even over a pale base like Sweet Talker, it catches the light really beautifully, almost like little sparkling scales. I used two coats here and the formula was pretty cooperative. I really love Snow Globe and I think it’s worth scouting out online. The clear base makes it really versatile and various base colors would definitely bring out different aspects of its iridescence. It’s an easy way to spruce up a mani, whether it’s snowing or sweltering outside!

Saturday, May 26, 2012

MAC Hey, Sailor! Lipglasses: Swatches & Review

So after thoroughly convincing myself that I wasn't going to pick up anything from MAC's new Hey, Sailor! Collection, the other night I made an impromptu late-night purchase off the MAC website and picked up two of the lipglasses from the collection: Blessedly Rich and Riviera Life. Overall the collection struck me as a little underwhelming but these two beauties caught my eye.


Blessedly Rich is a coppery coral with gold and pink shimmer.


The coverage on Blessedly Rich is fairly opaque. The texture is rather sticky but personally I didn't find it bothersome. The gloss didn't feather or settle into lines at all on my lips, despite a bit of the settling you see on my hand here. It lasts about two to three hours on me before it's probably time to reapply. Or, this gloss fades very evenly to a subtle, peachy sheen, so you could also leave it as-as if you like!


The second gloss I got is Riviera Life, a bright orange with gold shimmer.


Riviera Life is the more opaque of the two glosses and it covers extremely well. If you like colors like MAC Morange, you'll definitely be a fan of this gloss as well. It actually reminds me a lot of China Glaze Riveting, albeit in lipgloss form, obviously. I must confess that I'm a huge fan of bright, dramatic lip colors so an orange gloss is right up my alley. This has the same texture as Blessedly Rich and also leaves behind a bit of a stain after fading. Weartime is comprable to Blessedly Rich and also like Blessedly Rich, Riviera Life doesn't feather or settle on me either.

Also, if you're curious about the packaging, the glosses, like the rest of the Hey, Sailor! products, come in an adorable nautical-themed box:


I like Blessedly Rich but I love Riviera Life! However, I'd say both are worthy purchases. Riviera Life has the superior formula but both are great, so your personal color preferences may swing your decision one way or the other. Blessedly Rich is admittedly the more versatile of the two shades and would be easier to wear everyday. Both glosses retail for $15.50. (There are also three other glosses from this collection that I didn't get.) You can get them at your local MAC store/counter or online at the MAC and Nordstrom websites.

Finger Paints Sparkle Top Coat

I was digging through my stash the other night when I discovered this criminally untried beauty: Finger Paints Sparkle Top Coat. It was an impromptu purchase I made at Sally's one day and then completely forgot I even had. It's an iridescent color shifting topcoat and once I laid eyes on it again,  I instantly had to put it on. Black is a natural base color choice for layering polishes like these, but I was curious to see how it'd look over my Pixi Mink Grey manicure I was wearing. The answer? STUNNING. I suggest clicking to enlarge on these shots so you can see all the sparkly goodness up close!


The main color here is purple, but it shifts to yellow, pink and even a bit of orange. The effect is far more vivid in person and it just has so much life to it. Why did I wait so long to try this?! It's ridiculously gorgeous! The formula is fabulous as well. I used two coats here, although the results are already droolworthy at just one. I'm a shimmerwhore so I wanted to amp up the effect even more! I'm betting you could get an even more dramatic effect if you paired this over black.


This is one amazing polish! I want to layer it over everything now! I'm not sure what the availability for this is still like, since I bought it a few months ago. But if by some chance you see this at your local Sally, GET IT!

Thursday, May 24, 2012

Orly Flash Glam FX Preview

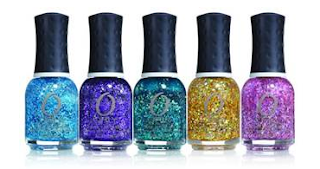
I have been waiting for Orly to come out with a new FX Collection. My love for the previous FX polishes is no secret. Thankfully it looks like another collection is upon us! The latest installment will be called the Flash Glam FX Collection and it will apparently feature 22(!) prismatic, chunky layering glitters. 22 seems like an awfully large collection to me, but that's what the word is online. Let's sneak a peek at five of these upcoming lovelies!


L to R: It's Electric, Can't Be Tamed, Go Deeper, Sashay My Way, Be Brave

It's always hard to judge glitters based on preview pictures, but so far these look promising! I'm especially intrigued by It's Electric. I'll update this preview if promo shots of any additional polishes from this collection surface in the near future. The official release date for the Flash Glam FX Collection is June, but I've read several people have already spotted these at their local Sally. Keep in mind that unlike regular Orly, the FX polishes cost $10.

Will you be indulging in the newest FX offerings? Do you like the idea of a larger collection or is it too overwhelming?

Wednesday, May 23, 2012

Pixi Polish: Swatches & Review

You may already be familiar with the cosmetics brand Pixi from shopping adventures at your local Target. (Have you seen their adorable new Tinkerbell Collection?! I haven't indulged--yet--but it always catches my eye!) Well, now Pixi is dipping its newly manicured fingers into the nail polish market as well. Their polish line launched with twelve colors and I've got three of them to share with you today!


First up is Summer Pink, a retina-searingly bright neon pink creme.


What a perfect name for this color. Neons are a huge nail trend this season, as I'm sure you've noticed! This neon means business. It is bright, even more so than how it appears in these pictures. I can see myself wearing this one a lot, especially now that the weather is heating up. It's a fabulous color that instantly reminds me of the beach. Summer Pink has an excellent formula that didn't pose any problems for me. This is two coats.

Next up we have Cabana Coral, an orange-leaning neon coral creme.


This is another great summer color and it strikes me as fairly unique in the realm of summer neons. You see lots of pink-leaning corals but I can't recall another neon coral that leans quite this orange; I dig it. It's a very pretty, almost melon-y shade. The formula was right on par with Shocking Pink and applied flawlessly. This is two coats. I also like that both of these neons don't dry to a matte finish, but a true creme.

And now for something completely different! Lastly there's Mink Grey, a greige creme.


Mink Grey has this muted purple lean to it that I really like. I own quite a few greige polishes and this is a lovely one. It's practically a one-coater, but I used two just to even out a few little areas.

Overall I'm extremely impressed by Pixi's first foray into polish and it's safe to say this polish line has captured my interest. The colors are very fun and on-trend and the formula for all three polishes I tried was wonderful. These polishes have a skinny brush, similar to Essie's, that makes it really easy to do neat, precise application. I'd be very tough for me to pick a favorite among these three, because I honestly loved them all.

Pixi Polish is three-free and retails for $8. Each bottle is 0.25 oz. You can find Pixi at your local Target or online at Pixi's official website.


Disclosure: These polishes were sent to me for my honest, unbiased review. For more information, please see my disclosure policy.

Essie Mojito Madness

Hey girls! Hope you all are keeping cool this week! It's been inssannneelly hot where I live. I've even been keeping some of my lipsticks in the fridge because I was afraid they'd melt on my dresser. Priorities: I have them.

Luckily I've been keeping cool with a Mojito--Essie Mojito Madness, that is! Mojito Madness is a bright green creme. Since Essie rarely makes greens and green is possibly my favorite polish color, whenever they come out with a new one, I absolutely have to have it! Thankfully Mojito Madness did not let me down.


I adore this color. It's vibrant yet there is a certain softness to it at the same time. It just looks so cute and fresh! For the record, this is lighter than one of Essie's other famous greens, Pretty Edgy, so you don't have to worry about dupes if you already own Pretty Edgy.

The formula is great too. Everything covered smoothly in two coats. I've been wearing this for three days now with no signs of wear and zero chips. Any of my fellow Essie green hoarders (I know you're out there!) will definitely want to pick this one up!

Tuesday, May 22, 2012

Twinsie Tuesday: Ombre Manicure

Welcome to another fabulous installment of Twinsie Tuesday! This week's theme is ombre manicure. Ombre is the French word for shadow, so for an ombre manicure you do polishes in the same color that advance in tone from light to dark, creating a gradient or shadow-like effect. For my ombre manicure, I opted to use one of my favorite polish colors: pastel green! I figured I'd have a large enough variety of this color to create a decent ombre effect and I'm really happy with how it turned out!


I've done an invididual post on all of the polishes I used for this mani except one, so you can click on most of the names below to be taken to that polish's post if there are any colors in particular that you'd like to learn more about. The polishes I used are:


Well, that about wraps it up for me today! Head on over to the other Twinsie Tuesday blogs for more ombre action!


Amanda: http://amandalandish.blogspot.com/
Anna: http://goingtotheshowing.blogspot.com/
Anne: http://grapefizz.blogspot.com/
Ashley: http://artevolve.blogspot.com/
Brandi: http://thecollegiatenail.blogspot.com/
ChiChi: http://beautystarr1009.blogspot.com/
Cordia: http://srslyswatched.blogspot.com
Jenn: http://allthatisgorgeous.blogspot.com/
Jenna: http://www.jennafroggy.com/
Katherine: http://hauloffame.blogspot.com/
Marisa: http://marijonails.blogspot.com/
Meredith: http://polishandcharms.blogspot.com/
Nory: http://fiercemakeupandnails.blogspot.com/
Rachel: http://topcoatit.com/
Sarah: http://seesarahswatch.blogspot.com/
Tara: http://polishyoftruth.com/