Friday, May 31, 2013

NCLA Stephanie's Galaxy Nail Wraps: Review & Swatches


Always wanted to rock some galaxy nails without the hassle of creating them yourself? Then look no further, 'cuz it's NCLA Nail Wraps to the rescue! Their nail wraps in the Stephanie's Galaxy design give you instant galaxy nails with all of the cool factor and none of the creative confusion!

I was recently given the opportunity by the fine folks at Nail Polish Canada to try out some NCLA wraps and Stephanie's Galaxy is one of two designs I chose. (I did a review of the other design, Waxprint, last week. The wraps come in a ton of different designs, which you can browse through HERE) Each set of wraps comes with two sheets of 22 wraps each, plus a full size, nice quality nail file. You could create 3-4 manis from this set.

If you want to learn more about my experience applying these wraps, I discussed that at greater length in my review of the Waxprint wraps. But to sum it up, these are high quality, durable wraps that are easy to apply and look stunning on the nail. The wrap on my left index finger creased a bit around the edges after a few days of wear, but otherwise, these held up very well. You don't need any type of special adhesive or application process for these--just peel, place, smooth out any air bubbles or creases, seal with topcoat and you're done!


I have always admired galaxy manis but didn't dare attempt one on my own, so I'm really happy that something like this exists! NCLA's wraps are some of the easiest I've used and I love how many different variations of the design come with each set. You get plenty of variety to create a unique mani each time.

Have you ever tried any nail wraps, NCLA or otherwise? What are some of your favorites?


Disclosure: This product was sent to me for my honest review. For more information, please see my disclosure policy.

Thursday, May 30, 2013

Guest Post At Paint Crush Magazine

I've got a guest post over at Paint Crush Magazine today where I talk about some of my all-time favorite nail care products! I've got a little sneak preview here...


...and then if you want to learn more, head on over to Paint Crush Magazine HERE to read the whole post! I hope you like it! What are some of your favorite products for keeping your nails happy and healthy?

Wednesday, May 29, 2013

Illamasqua Scorch

White polish may not be the most exciting thing to talk about, but I'm of the opinion that everyone needs to have a good white in their stash to use for layering. I am just about out of my longtime go-to white polish, Sally Hansen White On, so when I had the chance to snag Scorch on clearance for about the same price as Sally, I couldn't pass that deal up! I'd never wear white polish on its own (reminds me too much of white-out), but I figured I'd swatch it alone here in case any of you were curious about this polish.


For a white polish, the formula is surprisingly non-streaky. It'd be nice if it was a touch thicker, just based on my own personal preferences, but other than that, I was impressed with how nicely this applies. I used three coats here. I like the high gloss finish Scorch has and it looks clean and smooth, making it an ideal base for layering.

Although this is a nice white, I would never pay the usual $17 Illamasqua price for white polish. To me, a higher price point is worth it if the color is something unique, but I just don't use white polish enough to justify the splurge. I am really happy I got Scorch on sale and I will definitely use it until it's completely gone but once I run out, I'll pick up something more affordable rather than re-purchase.

Tuesday, May 28, 2013

Twinsie Tuesday: China Glaze Pool Party

Our task for this week's Twinsie Tuesday was to pick a polish that can transition from spring to summer. I figure pink is a shade that works year-round, so that would make a good candidate for a transitional polish. As for the summer part of this theme, when I start to see neon shades everywhere, that means summer is finally on its way! So since it seemed only right to go with a neon pink, I pulled out China Glaze Pool Party, a warm-toned neon pink.


China Glaze is well-known for their neons and for good reason. They're super bright, true neons and (mostly) easy to work with. Pool Party was really easy to apply--no streaking and no white base necessary to really make the color pop. I used three coats of Pool Party here.

I would have loved to rock Pool Party at an actual pool during yesterday's holiday, but A) it rained most of the day here and B) my new swimsuit hasn't arrived in the mail yet! I ordered this little retro-style high-waisted red polka dot bikini and I am dying to take a swim now that we finally have some warm weather here!

Did you do anything fun yesterday? What are some of your favorite mani colors during the summer? I'd love to hear all about it in the comments! And be sure to check out what all of my Twinsies are wearing today too!


Chelsea at Nailed Blog
Elizabeth at Did My Nails
Katherine at Haul of Fame
Traci at DrinkCitra

Saturday, May 25, 2013

Born Pretty Feather Nail Art Water Decals: Review & Swatches


I've reviewed some of these decals from Born Pretty Store before that came in a zipper design and the resulting mani was one of my all-time favorites. So naturally, I was dying to try some more of these decals. They make it look like you spent hours on your nails when really it only takes a few minutes!

The decals I tried out this time around (check 'em out on the Born Pretty website HERE) feature all kinds of feathers. You get a huge sheet of decals featuring 11 different feather designs. Each design has 20 decals each, so that's over 20 manis from a set that costs less than five bucks! That's an awesome value! Here's a look at all the designs you get.

 The whole sheet
Bottom half
 Top half

Applying these decals is extremely easy. Remember putting on temporary tattoos as a kid? These basically work like that! You stick the decal in some water, peel the decal off its paper backing (I find tweezers help) then place on your nail. If you mess up, the decals are still adjustable while wet, so you can move them around until they're perfect. Then just seal everything in with topcoat. Super simple!

You could create hundreds of different looks with all the decals that come on this sheet. Here's one I came up with using decals from 5 of the 11 design sections and with Illamasqua Scorch, a white creme, as my base!


I also did a second mani using the peacock feather decals, with Precision You're In De-Nile River for my base. (I've got a big Precision review coming up soon too!)


These decals are yet another example of an awesome nail art product from Born Pretty. Whether you're a nail art pro or n00b, I think you'll love these! The decals are beautiful, high quality and very nicely priced, especially when you consider the fact that you're getting 11 design themes and over 200 decals here.

If you decide to pick up any Born Pretty goodies, they've been nice enough to provide this 10% off code for Nailed readers!


Disclosure: This product was sent to me for my honest review. For more information, please see my disclosure policy.

Rainbow Honey Fab Summer Set: Review & Swatches


How about some brand new Rainbow Honey to brighten up your day? :) I recently received Rainbow Honey's Fab Summer Set and it is just as bright, fun and sparkly as you would expect! The set, which is available exclusively at Fab, consists of three full-size, all-new polishes--Tenda, Schrammi and Costa del Sol--and retails for $25.

Tenda is a bright kelly green with flecks of gold. I love green polish in general, so naturally I can't resist a green as bright and beautiful as Tenda! This is two coats.


Schrammi is a deep coral with the same beautiful golden flecks found in Tenda. This is such a rich coral and it just screams summer. It makes me think of sipping something sweet and citrus-y poolside. If you're a fan of coral, you need this one!

 
Then last, but certainly not least, is Costa del Sol, an explosion of holographic, iridescent and golden glitter sure to add a splash of sunshine to any mani. There's no fishing and no placing with this one--just smooth, golden goodness that glides effortlessly across the nail. Here is one coat over Schrammi. (These pics also give you a look at Schrammi in low light, as opposed to the direct sunlight swatch above.)


The formula on all three of these polishes is excellent, as usual from Rainbow Honey. I really like all three polishes, but Schrammi may just be my favorite. All in all, it's an excellent set and a great summer addition to any collection!


Disclosure: These polishes were sent to me for my honest review. For more information, please see my disclosure policy.

Friday, May 24, 2013

Orly Surreal Color Preview


We've got another glimpse at what this fall has in store for us with a sneak peek at Orly's upcoming Surreal Color Collection today! These six new polishes will be hitting the shelves in August.

Orly, Nail Polish, Nail Polish News
L to R: Pink Waterfall, Pixie Powder, Angel Rain, Purple Poodle, Teal Unreal, Digital Glitter

I love the names--very cute! Purple Poodle and Teal Unreal look like they might be up my alley. This is a completely frivolous observation, but can I also mention that while I like the new caps for Orly's re-design, I really miss the big O's the old bottles had? Somehow that just seemed more fun than the new brand logo.

Anything going on your wishlist? And I am the only one missing Orly's old bottle design?

Thursday, May 23, 2013

Kat Von D Lock-It Tattoo Foundation: Review & Swatches

My skin has good and bad days, but when I need to look my best no matter what my skin has in mind, I put on my Kat Von D Lock-It Tattoo Foundation and tell acne to suck it! If you have oily and/or acne-prone skin and you need a foundation that means business, I think you'll love this full coverage foundation!


The foundation comes in a 1.0 oz cylinder with a pump at the top. I like that the packaging is not only pretty, but functional as well. The pump keeps the contents fresh and the clear tube lets you see how much more is left inside. My skin is NW20 and the Light 44 shade is a perfect match for me.

I was able to take this little dot...
...and blend it all across my forearm. You really do not need much of this foundation to get the job done!

So now let me tell you a bit about why I love this stuff. (WARNING: Big ol' block of text comin' atcha! Brevity is not one of my strong suits.) I've been using it on and off for several months now, giving me plenty of time to form a solid impression. It promises full coverage and 24-hour wear. On the full coverage front: man, they weren't kidding. This will cover just about anything--blemishes, scarring, hyperpigmentation, broken capillaries, redness, you name it. I don't need any concealer when I use this!

A little bit of this foundation goes a looonnggg way, but it never looks or feels like you're wearing a mask. If you have dry skin and you're giving this foundation a try though, I'd recommend making sure you have a good exfoliant and moisturizer, because it can accentuate any areas of dry or flaky skin due to its true matte finish. But oily skin will love its smooth, porcelain look.

My favorite ways to apply this foundation are with either a damp cosmetic sponge or a dense synthetic bristle brush. The right tools really help with the texture of this foundation and give you beautifully natural yet full coverage. Don't be afraid to really press down and buff it in. I use Urban Decay's Optical Blurring Brush and it makes a fantastic partner for this foundation! Once you find an application method you like, you are golden, because this stuff really covers and gets the job done!

In terms of weartime, I think the 24-hour claim is a bit much. In reality, it's closer to 12 hours or so, which is still great. I usually have to blot my chin (the oiliest area on my face) once, but otherwise, it lasts me all day, no problem. I also love that I don't ever have to worry about any blemishes or red patches peaking through as the day goes on.

When I'm having a bad skin day or I'm going out at night and want to look extra dolled up, this is the foundation I reach for. I always get self-conscious when my skin is going haywire, so this is like my little confidence booster in a bottle. I don't worry about any acne or redness, because I know Kat has me covered. ;)

Have you tried this foundation? Love it? Hate it? I'd really like to hear what you think!

Wednesday, May 22, 2013

NCLA Waxprint Nail Wraps: Review & Swatches


Our friendly neighbors to the north over at Nail Polish Canada recently offered me the opportunity to try out some NCLA nail wraps. They have some absolutely gorgeous and very unique designs (scope them out at Nail Polish Canada HERE) so I was thrilled to have a chance to take these wraps for a test run! I'll be sharing Waxprint, the first of two designs I picked, with you today.

Each set of NCLA wraps retails for $16 and includes two sheets of 22 wraps each, plus a full size, nice quality nail file. In all, you could do 3-4 manis with this whole set. Both sheets look like this:


There's a little nub on the end of each wrap to help you peel it off the sheet. The directions that come with the wraps specifically say to peel off the wrap at the nub and I found that if I tried to peel off the wraps at another point (I know--rebel, rebel), sometimes I'd pull up some of the paper from the sheet itself. When this happens, you can easily peel off the paper using some tweezers and then the wrap is still useable, but I just wanted to note that you will have to peel at the nub. :)

Picking a wrap that looks slightly bigger than your nail usually turned out to be the right choice. You can always trim the wraps to fit or peel them off an use them on a different nail instead if you need to. Once it's peeled off, you just place the wrap, pull it taught across your nail, press down to smooth off any creases or bubbles, then file off the excess wrap using a downward motion. Seal the wraps in with topcoat (no downtime required between application and topcoat) and then bask in the glory of your awesome manicure!


And my rarely seen right hand! (It felt sooo weird trying to take swatches this way!)


Super cool, right? I absolutely love these wraps and I think the Waxprint design is amazing! Since each sticker has a completely unique design on it, you can create a new custom mani each time you use this set. I love it! The wraps are great quality too and last days without any chips, tears or peeling. I can't wait to try my other set!


Disclosure: This product was sent to me for my honest review. For more information, please see my disclosure policy.

Tuesday, May 21, 2013

Twinsie Tuesday: Lush Lacquer Green Genie

This week's Twinsie Tuesday theme, TT Revisted, allows us to take another shot at a challenge or theme we particularly enjoyed. Other than our copycat and marching order challenges, we hardly ever get a chance to duplicate a theme in TT, so there were a lot of options to choose from! I decided to go with indie polish, because you know I can never get enough of all my indie sparklies. ;)

What this polish lacks in sparkle, it more than makes up for in fun: Lush Lacquer Green Genie, from the brand's Neon Collection, is a lime green base filled with a rainbow of matte neon hex glitters. A co-worker of mine told me this polish looks like ice cream and I really like that description!


I love how colorful this is! The base color is kinda different too. It's not something you see very often, especially mixed with glitter. The shade of green is just bright enough for a fun pop of color but not so bright that it overshadows all the neon pieces. I used three coats here and the formula is great.

I wanted to point out too that all of the Neon Collection polishes I ordered (check out Neon Lights HERE if you missed it) are minis. Normally, I despise minis, but Lush Lacquer's minis come with full-sized handles, which make them really easy to work with. Their shop always has deals going where you can pick your own minis, so I love that you can try out a bunch of polishes from the brand at an affordable price without having to deal with the annoyances of small mini handles. The bottles are still a bit too small to hold comfortably for swatches though, hence the bottle of basecoat I'm clutching in these shots. :)

You can purchase Lush Lacquer on Etsy.


Chelsea at Nailed Blog
Elizabeth at Did My Nails
Katherine at Haul of Fame
Traci at DrinkCitra

Monday, May 20, 2013

Ruby Wing Crowd Surf

Hope you all had a fun weekend! My boyfriend and I went to see the Cole Porter musical "Anything Goes" yesterday. I didn't really know what to expect going in, but it was a super fun, high-energy show! We have tickets to see "Billy Elliot" in June and I'm very excited for that.

Anyways, ready to look at some polish? I thought so! ;) Let's check out some new Ruby Wing, shall we? Today I'll be showing off Crowd Surf, a color-changing purple that would look right at home soaking up some rays on the beach or rocking out at a summer music festival.

Indoors and in the shade, Crowd Surf is a very red-based (almost fuchsia-looking) neon purple. It was really tough to capture how this polish looks indoors, which is frustrating because it's my favorite of the two shades Crowd Surf shifts between. In real life, it's much more neon and not quite as pink-leaning as what you see in this picture.


In direct sunlight, it morphs into a deeper shade of purple. Unlike the indoors shade, this shot is color-accurate.


The formula on Crowd Surf is a touch streaky, but solid overall. I used two coats here. Unlike Ruby Wing's spring polishes, Crowd Surf is not scented. But, like many neons, it dries to a semi-matte finish, so you'll need topcoat to give it that glossy, vibrant look.

Overall, this is a really fun summer purple. I love how it looks indoors especially. In fact, I liked it so much I used it for my current pedi too! You can purchase Ruby Wing from the brand's website.


Disclosure: This polish was sent to me for my honest review. For more information, please see my disclosure policy.

Saturday, May 18, 2013

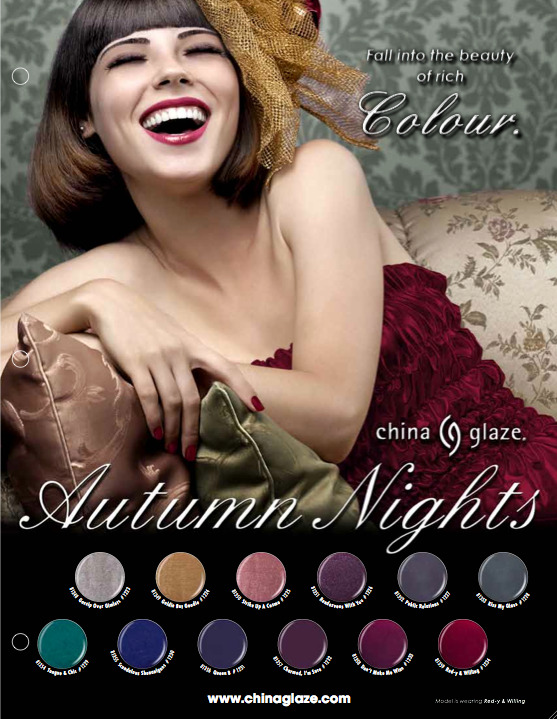
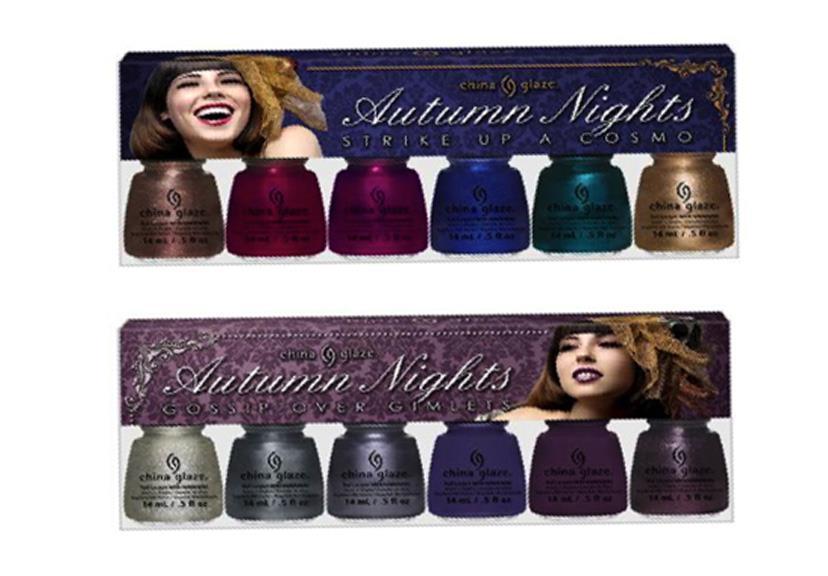
China Glaze Autumn Nights Preview

China Glaze's fall collection, Autumn Nights, features a dozen new shades that scream "autumn." Click to enlarge and get a good look at these puppies!

 
I have to confess: there are some nice-looking shades here, but nothing that gets me super excited. I'll have to wait for swatches before making any final decisions, of course, but right now this seems like a collection that really nails the autumn aesthetic, although it might not be the most unique bunch of colors. We'll see though when the collection is released August 1!

What do you think of Autumn Nights? Anything strike your fancy here?

Thursday, May 16, 2013

Born Pretty Nail Art Foils: Review & Swatches


I've got another ingenious nail art product to show you from Born Pretty Store today: nail foils! These foils come in a ton of fun colors (see them all HERE) and you can use them to create colorful metallic designs on your nail. I chose version #21, which has light blue, dark blue and green. The foil comes all rolled up in a little jar for easy storage.

The foil comes in one long, multi-colored strip...

 ...that's stored in this cute little plastic tube.

A lot of foils out there require an adhesive, but Born Pretty's work by simply applying them when your polish is still slightly tacky. There is a bright side to the foil that has all the colors on it and then a dull side. You just press the foil, colorful side facing up, against your nail and rub it with your finger. Pull it off in a swift motion and it will leave a patch of foil behind. It's incredibly easy and the nice thing is that since the technique is intended to create an abstract design, you don't have to worry about where you place the foil. It'll look cool no matter what you do and the end result is really eye-catching! I got a ton of compliments and questions about this mani, which is always fun. :)

I recommend using a dark color as your base, because it will help mask any smudges. Here is a foil mani I did with Rimmel Black Satin, a glossy black creme, for my base.


The foils themselves go on really smoothly and don't leave any rough or jagged edges sticking off your nail. Once I put my topcoat on, I didn't feel any type of unusual or unpleasant texture on top of my nails; the foils blended in seamlessly. I only had to use one small rectangle of foil for each hand, so I had a ton left over. It's safe to say a single roll will last through dozens of manis. Each roll costs only $2.99 and many of them feature multiple colors all in one, so you get a lot of bang for your buck here.

Overall, I absolutely love how quick and easy these foils are to use. They take all the guesswork out of a foil transfer mani and I can't stop staring at how brilliantly bright and shiny they look on my nails!

If you'd like to purchase anything from Born Pretty Store, Nailed readers get 10% off using the code below:


Disclosure: This product was sent to me for my honest review. For more information, please see my disclosure policy.

Essie Summer 2013 Preview

In addition to a set of new neons, Essie is rolling out its annual summer collection--and man, is it gorgeous! The colors! The shimmer! I love it all! These are slated to hit shelves in early June, so hopefully we won't have to wait too long for these beauties!


Essie Naughty Nautical Summer 2013 Collection (1)
L to R: Full Steam Ahead, Naughty Nautical, Rock The Boat
Essie Naughty Nautical Summer 2013 Collection (2)
L to R: Sunday Funday, The Girls Are Out, The More The Merrier


Yep, some of these will definitely be making their way home with me! I am excited for Naughty Nautical and The More The Merrier especially, but they all look great! I always love seeing some bright colors from Essie and when you couple that with some vibrant-looking shimmer? Sold!!

What about you? Will you be picking any of these up?

Wednesday, May 15, 2013

Giveaway Reminder

Hey all! Just a quick reminder that there's only about two days left to enter my giveaway to win a set of Jamberry Nails wraps in your choice of design! Click HERE to learn more! :)

Color Club Evolution


Color Club Evolution is a pretty sky blue creme from the brand's new Kaleidoscope Collection. It looks like a pastel blue in the bottle, but it's surprisingly vibrant on the nail. I absolutely adore bright blues like this! It's just such a cheerful-looking shade.


While I love the color, the formula was not my favorite. It is both streaky and thick, which makes for a less-than-ideal combination. I used three coats here. This is not the worst formula I've ever tried, but it could stand to be more workable. I've decided to use some thinner on this one for next time I use it. Hopefully that helps, because the color is truly gorgeous!

You can purchase Color Club from the brand's website.


Disclosure: This polish was sent to me for my honest review. For more information, please see my disclosure policy.