
Showing posts with label How-To. Show all posts
Showing posts with label How-To. Show all posts
Thursday, February 26, 2015
PSA: Fake OPI Update
Seeing as it continues to be one of the most popular posts on my blog, I wanted to let you guys know I've updated my How To Spot Fake OPI post with new information for 2015. I try to keep that post as up-to-date as possible and OPI has made some pretty significant changes to their bottle labeling this year--probably their biggest re-design in the past five years. So if you like to buy your OPI online, you might want to take a minute to look over the changes so you know what to look for with new, authentic OPI. Happy hunting! :)


Saturday, April 20, 2013
Alternative Uses For Nail Polish
Obviously we all use nail polish to brighten up our fingers and toes, but have you ever tried using nail polish as a quick fix or as part of a DIY project? There are seemingly endless ways to use nail polish, so today I thought it'd be fun to take a look at some of the many ways you can put nail polish to use around the house!

Make Metal Rust-Proof: This is great for objects in your bathroom (think shaving cream cans that leave rust rings in the shower) or outdoors. Just apply some clear nail polish on areas or surfaces prone to rusting and you're good to go!
Stop Bug Bites From Itching: Apply a dab of clear polish over a mosquito bite. The polish will cut the bite off from oxygen, stopping the itch temporarily.

Creat New Jewelry--Or Revamp Old Jewelry: Use polish to turn everyday items into fun statement pieces or add pops of color to old jewelry you no longer wear. Check out tutorials like this one and this one to help give you ideas!
Make Your Remote Control (Or Anything Else) Glow-In-The-Dark: Put a coat of glow-in-the-dark polish over your remote control buttons. Voila! No more squinting to tell the buttons apart in the dark! My old apartment also had glow-in-the-dark star stickers on all of the circuit breakers in the event of a power outage, so you could use glow-in-the-dark nail polish for this same purpose too.

Extend The Life Of Costume Jewelry: Inexpensive or costume jewelry can tarnish and leave green marks behind on your skin. Lightly coat your inexpensive jewelry with a bit of clear nail polish to help preserve it and prevent tarnishing. You can also use clear nail polish as a substitute adhesive to help repair broken jewelry, like for when you need to glue a loose stone back in place.
Threading A Needle: Coat the end of a cut thread with clear polish, then roll it back and forth between your thumb and index fingers to help it dry quickly. The thread will then be stiff enough to easily thread a needle.

Stop A Pantyhose Run From Spreading: This is one of my favorites and something I use nail polish for all the time. Apply clear (or black, if you want to help disguise the run in dark stockings) over a pantyhose run to keep it from spreading. It won't fix the run, but it'll get you through the day until you can pick up a new pair. You can use this same method for tears in window screens.
Protect Buttons: Use clear polish to keep button threads from fraying or to preserve the finish of decorative buttons, like pearl buttons.

Give Your High Heels A Makeover: Whether you're mimicking the famous red soles of Christian Louboutin or putting a splash of your favorite color on an old pair of shoes, start with a coat of white polish on the soles to make your color of choice extra vivid. Once the white polish has completely dried, go over it with a colored polish. Let it dry then hit the town in your fresh new heels!
Create Smudge-Proof Labels: Use clear polish to instantly waterproof your labels.

Color Coding: Use nail polish to differentiate between a set of keys or anything else that needs organizing.
Heal A Wart: Warts need oxygen to survive so sealing them off with clear polish will do the trick. I've never tried this myself, but it's widely reported on the internet that clear polish can kill off a war in about a week's time. Just make sure you throw out the polish in question afterwards so you don't spread any germs, or use a cotton swab to apply the polish directly on the wart to prevent contamination.
Do you have any tips and tricks for other ways to use nail polish? I'd love to hear them!

Stop Bug Bites From Itching: Apply a dab of clear polish over a mosquito bite. The polish will cut the bite off from oxygen, stopping the itch temporarily.

Creat New Jewelry--Or Revamp Old Jewelry: Use polish to turn everyday items into fun statement pieces or add pops of color to old jewelry you no longer wear. Check out tutorials like this one and this one to help give you ideas!
Make Your Remote Control (Or Anything Else) Glow-In-The-Dark: Put a coat of glow-in-the-dark polish over your remote control buttons. Voila! No more squinting to tell the buttons apart in the dark! My old apartment also had glow-in-the-dark star stickers on all of the circuit breakers in the event of a power outage, so you could use glow-in-the-dark nail polish for this same purpose too.

Extend The Life Of Costume Jewelry: Inexpensive or costume jewelry can tarnish and leave green marks behind on your skin. Lightly coat your inexpensive jewelry with a bit of clear nail polish to help preserve it and prevent tarnishing. You can also use clear nail polish as a substitute adhesive to help repair broken jewelry, like for when you need to glue a loose stone back in place.
Threading A Needle: Coat the end of a cut thread with clear polish, then roll it back and forth between your thumb and index fingers to help it dry quickly. The thread will then be stiff enough to easily thread a needle.

Stop A Pantyhose Run From Spreading: This is one of my favorites and something I use nail polish for all the time. Apply clear (or black, if you want to help disguise the run in dark stockings) over a pantyhose run to keep it from spreading. It won't fix the run, but it'll get you through the day until you can pick up a new pair. You can use this same method for tears in window screens.
Protect Buttons: Use clear polish to keep button threads from fraying or to preserve the finish of decorative buttons, like pearl buttons.

Give Your High Heels A Makeover: Whether you're mimicking the famous red soles of Christian Louboutin or putting a splash of your favorite color on an old pair of shoes, start with a coat of white polish on the soles to make your color of choice extra vivid. Once the white polish has completely dried, go over it with a colored polish. Let it dry then hit the town in your fresh new heels!
Create Smudge-Proof Labels: Use clear polish to instantly waterproof your labels.

Heal A Wart: Warts need oxygen to survive so sealing them off with clear polish will do the trick. I've never tried this myself, but it's widely reported on the internet that clear polish can kill off a war in about a week's time. Just make sure you throw out the polish in question afterwards so you don't spread any germs, or use a cotton swab to apply the polish directly on the wart to prevent contamination.
Do you have any tips and tricks for other ways to use nail polish? I'd love to hear them!
Thursday, October 18, 2012
Adventures in Zooey Deschanel Nail Art
I have a confession to make: I am an awards show junkie. I watch the Oscars (my equivalent of the Superbowl), the Emmys and the Golden Globes every year. I really couldn't tell you what I love more: the gowns or the awards themselves. What girly girl hasn't thought about what she would wear if she was a star on the red carpet?
 Okay, so I highly doubt I'll ever get to have my Fan Bingbing moment. *sigh* But I can try to capture a little bit of red carpet glamour on my nails with some help from another leading lady who's becoming very well known for her red carpet nail art.

Zooey is a modern style icon, so of course her nails have to look the part too, whether it's her adorable tuxedo nails at the Golden Globes or the retro TV design she sported at the Emmys this year.

Super cute, right? Zooey's look is pretty easy to replicate, even for a nail art newbie like me! I followed along with the steps celeb manicurist Tom Bachik did on Zooey's nails for the Emmys to create my own version of her mani. Here's how it all went down...
1. Start with a thin layer of a bright yellow polish. I used Wet N Wild Art Crime, but any yellow will work just fine. Don't worry about opacity or if it doesn't look completely perfect, because we're just using it as a base.

2. Next layer one coat of a soft pastel peach, like L'Oreal Sweet Nothings that I used here, to soften the yellow. The way my camera captured this step makes my nails look way too yellow compared to how they really were, so I left a pic out for this step, but the look we're going for is a muted yellow. Your nails should not look completely peach, just softened.
3. On your thumb, make a small square in the center of your nail using a silver glitter. I went with OPI Crown Me Already! here.

4. Wait a few minutes for everything to dry, then outline your glitter square using a black nail art pen. I used a Sally Hansen one for my mani. Remember to round the corners on your outline to really get that retro look! Don't forget to draw in the rest of the details--antenna and TV stand legs--with your black nail art pen too. For the TV knobs, Zooey's manicure had Swarovski crystals, but I used a silver Sally Hansen nail art pen for my version.

6. The rest of Zooey's nails were spangled with Swarovski crystals here and there, so I dabbled Crown Me Already! on my nails to mimic the effect.

Ta-da! Okay, so my version isn't anywhere near as glamorous as Zooey's but this is pretty advanced nail art by my standards! I'm proud of myself for sticking with it, even when I had one of those inevitable "OMFG what have I done?!" moments. (*ahem* shaping the TV corners) Hopefully I didn't shame her gorgeous manicure too much with my attempt!

Hint: This. I would want to look like this. In case you were wondering, this is Chinese actress Fan Bingbing looking ten million kinds of fierce on the RC. Basically, I would wear anything that Fan Bingbing would wear.

Zooey at the 2012 Emmys
Zooey is a modern style icon, so of course her nails have to look the part too, whether it's her adorable tuxedo nails at the Golden Globes or the retro TV design she sported at the Emmys this year.
Zooey's Emmy nails
Super cute, right? Zooey's look is pretty easy to replicate, even for a nail art newbie like me! I followed along with the steps celeb manicurist Tom Bachik did on Zooey's nails for the Emmys to create my own version of her mani. Here's how it all went down...
1. Start with a thin layer of a bright yellow polish. I used Wet N Wild Art Crime, but any yellow will work just fine. Don't worry about opacity or if it doesn't look completely perfect, because we're just using it as a base.

If you look jaundiced, you're doing it right!
2. Next layer one coat of a soft pastel peach, like L'Oreal Sweet Nothings that I used here, to soften the yellow. The way my camera captured this step makes my nails look way too yellow compared to how they really were, so I left a pic out for this step, but the look we're going for is a muted yellow. Your nails should not look completely peach, just softened.
3. On your thumb, make a small square in the center of your nail using a silver glitter. I went with OPI Crown Me Already! here.

4. Wait a few minutes for everything to dry, then outline your glitter square using a black nail art pen. I used a Sally Hansen one for my mani. Remember to round the corners on your outline to really get that retro look! Don't forget to draw in the rest of the details--antenna and TV stand legs--with your black nail art pen too. For the TV knobs, Zooey's manicure had Swarovski crystals, but I used a silver Sally Hansen nail art pen for my version.

6. The rest of Zooey's nails were spangled with Swarovski crystals here and there, so I dabbled Crown Me Already! on my nails to mimic the effect.

Ta-da! Okay, so my version isn't anywhere near as glamorous as Zooey's but this is pretty advanced nail art by my standards! I'm proud of myself for sticking with it, even when I had one of those inevitable "OMFG what have I done?!" moments. (*ahem* shaping the TV corners) Hopefully I didn't shame her gorgeous manicure too much with my attempt!
What do you think of Zooey's style? Have you ever tried to replicate a celeb manicure?
Disclosure: Sweet Nothings was provided to me by PR/manufacturer for this tutorial. This in no way alters or influences the content of this post. All other polishes were purchased by me. For more information, please see my disclosure policy.
Wednesday, September 19, 2012
Glue Basecoat For Easy Glitter Removal: Instructions, Tips & FAQ
Oh, the things we do for glitter... Right, girls?

Luckily, as I'm sure by now many of you have heard by now, there's a new, easier way to take off your glitter polish: glue basecoat. It all began when Essence came out with a peel-off basecoat, which it turned out was basically just the same ingredients as craft glue, plus some water and preservatives. Remember the weird satisfaction of peeling dried glue off your hands as a little kid? Well this is pretty much the same idea: being able to peel off glitter nail polish all in one go! No scrubbing, no foil, no hassle!
I will try anything for easy glitter removal, so naturally I had to test this out for myself after hearing all the hype. After doing several manis with a glue basecoat, I wanted to share my results with you all, plus some tips in case you were curious to try it too! I'm happy to report that the glue basecoat really works and is the easiest method I've ever tried for glitter removal!
The ingredients are really simple--and dirt cheap too! All you need is some non-toxic glue and an empty polish bottle.
 I made sure to clean out the bottle really well by turning it upside down for a few hours and then swirling some acetone inside for good measure too. Then I squirted the glue inside the bottle until it was about 85% full. I added a bit of water to make the glue thinner and more workable, but this step is completely optional. I personally don't like working with thick bases, but everyone is different, so you can fill it all the way up with just glue if you prefer. If you do add water though, make sure you shake the bottle up afterwards to really mix it in good with your glue.
Then, simply apply the glue like you would a normal basecoat. Allow about 5 minutes to dry (5-10 if you didn't add water), then go ahead and paint your nails like usual. When you're ready to take your mani off however many days later, wedge in a cuticile stick or something similar and go to town peeling! It's oddly addicting! I always just peel the polish off in the shower. The glitter comes right off and you can usually get it all in one big piece too.
Now for the FAQ portion of this post:
Is it safe?
So long as you're using craft glue (check your labels--think Elmer's or something similar), then it's non-toxic. Children have been using this stuff in school for years with no ill effects. Heck, some of you probably ate Elmer's glue in elementary school--you know who you are. ;)
Does it damage your nails?
I haven't seen any negative impact on the strength or texture of my nails. If anything, it's made my nails and my cuticles happier because I'm not soaking them in acetone all the time! However, this does lead me to my next point, which is important...
Do I use a regular basecoat with a glue basecoat?
No. I've read some people saying you can if you really want to, but that it makes removal more difficult. Others have also said that pairing glue basecoats with some traditional basecoats (Orly Bonder, OPI Nail Envy, etc.) has caused the glue to pull up layers of their actual nail. So only use a glue basecoat on bare nails!
Is this basecoat waterproof? How well does it wear?
I've been able to shower and wash my hands as usual with the glue basecoat and the glue holds up just fine. I haven't noticed any significant differences in weartime or durability.
Hopefully this post has been helpful! I think this is a real game-changer for us glitterhounds. It's cheap, it's easy and it works! What's not to like? :) Happy polishing, ladies!

True. So painfully true.
Luckily, as I'm sure by now many of you have heard by now, there's a new, easier way to take off your glitter polish: glue basecoat. It all began when Essence came out with a peel-off basecoat, which it turned out was basically just the same ingredients as craft glue, plus some water and preservatives. Remember the weird satisfaction of peeling dried glue off your hands as a little kid? Well this is pretty much the same idea: being able to peel off glitter nail polish all in one go! No scrubbing, no foil, no hassle!
I will try anything for easy glitter removal, so naturally I had to test this out for myself after hearing all the hype. After doing several manis with a glue basecoat, I wanted to share my results with you all, plus some tips in case you were curious to try it too! I'm happy to report that the glue basecoat really works and is the easiest method I've ever tried for glitter removal!
The ingredients are really simple--and dirt cheap too! All you need is some non-toxic glue and an empty polish bottle.

Like so.
Then, simply apply the glue like you would a normal basecoat. Allow about 5 minutes to dry (5-10 if you didn't add water), then go ahead and paint your nails like usual. When you're ready to take your mani off however many days later, wedge in a cuticile stick or something similar and go to town peeling! It's oddly addicting! I always just peel the polish off in the shower. The glitter comes right off and you can usually get it all in one big piece too.
Now for the FAQ portion of this post:
Is it safe?
So long as you're using craft glue (check your labels--think Elmer's or something similar), then it's non-toxic. Children have been using this stuff in school for years with no ill effects. Heck, some of you probably ate Elmer's glue in elementary school--you know who you are. ;)
Does it damage your nails?
I haven't seen any negative impact on the strength or texture of my nails. If anything, it's made my nails and my cuticles happier because I'm not soaking them in acetone all the time! However, this does lead me to my next point, which is important...
Do I use a regular basecoat with a glue basecoat?
No. I've read some people saying you can if you really want to, but that it makes removal more difficult. Others have also said that pairing glue basecoats with some traditional basecoats (Orly Bonder, OPI Nail Envy, etc.) has caused the glue to pull up layers of their actual nail. So only use a glue basecoat on bare nails!
Is this basecoat waterproof? How well does it wear?
I've been able to shower and wash my hands as usual with the glue basecoat and the glue holds up just fine. I haven't noticed any significant differences in weartime or durability.
Hopefully this post has been helpful! I think this is a real game-changer for us glitterhounds. It's cheap, it's easy and it works! What's not to like? :) Happy polishing, ladies!
Saturday, February 18, 2012
How To Spot Fake OPI
UPDATE: This post has become one of the most popular entries on my blog, so I try to keep this information as up-to-date and in-depth as possible. This post was last edited in February 2015. If you have any questions about OPI authenticity that are not covered in this post, please feel free to ask in the comments section and I'll answer as best I can. Enjoy!
Yes, people seriously counterfeit nail polish. If you're buying your OPI from a reputable store like Ulta or Trade Secret then obviously you have nothing to worry about in terms of authenticity. But many of us, myself included, sometimes turn to Ebay or Amazon to track down older OPI polishes or get a cheaper price. Aside from doing your research into a seller's feedback history and using common sense (if it's too good to be true, it probably is), there are a few tricks you can use to differentiate the fakes from the real deal. Here are some details authentic OPIs will have.

There are a couple little details to look out for on the front of the bottle. "mL" should be lower-case m followed by a capital L and "Fl" should be capital F followed by lower-case l.
The details on the back of the bottle will vary depending on what era your OPI came from. Older OPIs (the ones with black text on the bottom label rather than green text) will have three warning labels. Any black label polishes manufactured from around 1997 to 2002 will have only two warning labels, not three. Any pre-1996 polishes will simply have warning text in place of labels. EDIT: A thank you goes to reader Ashley for helping me fill in some of the date-specific info about older OPIs. I don't have any OPIs with zero or two warning labels in my stash, but the ones with three will have the labels in this order.

OPI collections from around the 2009-2012 era (The bottle you see below is from the Holland Collection, released in spring 2012.) will have three warning labels in this order:

Slightly older OPIs (but still with the green label on the bottom, not the black) will have four warning labels in this order:

I'm not sure exactly when OPI made the switch from four to three labels but for reference the polish above is A Good Man-darin Is Hard To Find from the 2008 Hong Kong Collection so I'd say somewhere around 2009 is when they originally dropped the fourth label.
Anything from the Skyfall Collection (Holiday 2012) onward now carries four warning labels again, in this order:

OPI made a couple changes for 2015 to both the labeling on the bottle and the tags on the bottom of the bottle. I'll get to the tags in a minute, but here is how the back of the bottle looks now. The only thing that's different is for many years, the address listed above the warning labels was in Helmond, Netherlands and now it's for an address in Paris, France. The warning labels and the American address are still the same.
.JPG)
On the bottom of the bottle, there will be two labels on top of each other. Pre-2015 polishes will have a "PEEL HERE" tab on the top label. The top label should have a barcode, color name and color code. The text will either be green or black depending on when the polish was originally made. Make sure the color code (the five characters listed underneath the color name) and name match what is listed on OPI's official site.

Green label:

.JPG)
As you can see, for 2015, OPI is back to black text and there's an arrow symbol in place of the "PEEL HERE." The barcode and the five-character color code are still featured on the label though.
The second label has the color name and code. Any polish that has only one label on the bottom is suspect. The second label underneath should look like this:

Newer OPIs (say, collections that came out around 2013 until late 2014) have similar-looking second labels, except that the company name is written horizontally above the color name, rather than wrapped around the edge of the sticker as you see in the picture above.
.JPG)
Again, we've got some changes to the second label for 2015. The design has been simplified, with only the company logo, color name and color code:
.JPG)
However, please note that OPI minis do not have labels or names on the bottoms but the color code should still be inked onto the bottom of the bottle for reference purposes. EDIT: Thank you to reader FabbyNailedIt for sharing that minis will also not have any mixing balls like the full-sized bottles do.
The majority of OPI bottles will have engraved numbers somewhere on the bottle. There should either be black numbers stamped along the bottom or white numbers faintly embossed across the top--or both. The numbers are unique to each bottle so it's just a matter of whether or not they're there rather than what exactly the numbers are.
However, some of the Japanese-exclusive OPIs, older polishes or ones that come in duo sets will not have engravings. For instance, my Serena Williams duo polishes did not come with any engravings on them. A lot of my newer OPIs from 2013 also do not seem to have these engravings, so perhaps it is a feature that's being phased out. EDIT: Reader Fluff-Anna from Sweden has also reported that her authentic, store-bought OPIs do not have the white engraved numbers, only the black stamped numbers, so it's possible that the numbers may vary from region to region.


Some retailers (even legitimate brick-and-mortar stores) will file the white numbers off the top of the bottle, which according to OPI they aren't supposed to do, but if you notice a little dent around the top of your bottle, that's likely what happened.

Lots of fakes have a plastic seal on the cap advertising the "Exclusive ProWide Brush." Only a few authentic OPIs (mostly older colors, it seems) actually have this seal so if you notice every polish from a seller has this seal, they're fakes.
Fake OPIs are also known to have crooked or visibly shorter lids than genuine OPIs. Many fakes also have a visibly rougher texture on the top of the caps than genuine OPIs do. There should also be a small dot indentation on the "P" on the cap.
The inside of the cap should have ridges like a gear. EDIT: Thanks to Rachel for pointing out that DS polishes do NOT have gears inside the lid since they have silver tops, not the usual black ones. Black label OPIs also do not have the gears inside the caps.

The wand of the brush for genuine OPIs should have OPI imprinted on one side of the brush. You will likely have to wipe polish off the brush since it can be pretty faint. Apparently some of the fake bottles have this imprint as well, so you'll need to do some other tests to make sure you've got an authentic product. Older OPIs (pre-2006) also may not have this imprint.

I've also heard that some fake OPIs smell really terrible, since they're likely made with different chemicals from genuine OPIs, so that's something to look out for as well. Some fakes are easy to spot while others can be a bit trickier since manufacturers of fakes are becoming increasingly attentive to detail. Remember to always do your homework before purchasing and trust your gut!
Yes, people seriously counterfeit nail polish. If you're buying your OPI from a reputable store like Ulta or Trade Secret then obviously you have nothing to worry about in terms of authenticity. But many of us, myself included, sometimes turn to Ebay or Amazon to track down older OPI polishes or get a cheaper price. Aside from doing your research into a seller's feedback history and using common sense (if it's too good to be true, it probably is), there are a few tricks you can use to differentiate the fakes from the real deal. Here are some details authentic OPIs will have.

There are a couple little details to look out for on the front of the bottle. "mL" should be lower-case m followed by a capital L and "Fl" should be capital F followed by lower-case l.
The details on the back of the bottle will vary depending on what era your OPI came from. Older OPIs (the ones with black text on the bottom label rather than green text) will have three warning labels. Any black label polishes manufactured from around 1997 to 2002 will have only two warning labels, not three. Any pre-1996 polishes will simply have warning text in place of labels. EDIT: A thank you goes to reader Ashley for helping me fill in some of the date-specific info about older OPIs. I don't have any OPIs with zero or two warning labels in my stash, but the ones with three will have the labels in this order.

OPI collections from around the 2009-2012 era (The bottle you see below is from the Holland Collection, released in spring 2012.) will have three warning labels in this order:

Slightly older OPIs (but still with the green label on the bottom, not the black) will have four warning labels in this order:

I'm not sure exactly when OPI made the switch from four to three labels but for reference the polish above is A Good Man-darin Is Hard To Find from the 2008 Hong Kong Collection so I'd say somewhere around 2009 is when they originally dropped the fourth label.
Anything from the Skyfall Collection (Holiday 2012) onward now carries four warning labels again, in this order:

OPI made a couple changes for 2015 to both the labeling on the bottle and the tags on the bottom of the bottle. I'll get to the tags in a minute, but here is how the back of the bottle looks now. The only thing that's different is for many years, the address listed above the warning labels was in Helmond, Netherlands and now it's for an address in Paris, France. The warning labels and the American address are still the same.
On the bottom of the bottle, there will be two labels on top of each other. Pre-2015 polishes will have a "PEEL HERE" tab on the top label. The top label should have a barcode, color name and color code. The text will either be green or black depending on when the polish was originally made. Make sure the color code (the five characters listed underneath the color name) and name match what is listed on OPI's official site.
Black label:

Green label:

New (2015) label:
As you can see, for 2015, OPI is back to black text and there's an arrow symbol in place of the "PEEL HERE." The barcode and the five-character color code are still featured on the label though.
The second label has the color name and code. Any polish that has only one label on the bottom is suspect. The second label underneath should look like this:

Newer OPIs (say, collections that came out around 2013 until late 2014) have similar-looking second labels, except that the company name is written horizontally above the color name, rather than wrapped around the edge of the sticker as you see in the picture above.
Again, we've got some changes to the second label for 2015. The design has been simplified, with only the company logo, color name and color code:
However, please note that OPI minis do not have labels or names on the bottoms but the color code should still be inked onto the bottom of the bottle for reference purposes. EDIT: Thank you to reader FabbyNailedIt for sharing that minis will also not have any mixing balls like the full-sized bottles do.
The majority of OPI bottles will have engraved numbers somewhere on the bottle. There should either be black numbers stamped along the bottom or white numbers faintly embossed across the top--or both. The numbers are unique to each bottle so it's just a matter of whether or not they're there rather than what exactly the numbers are.
However, some of the Japanese-exclusive OPIs, older polishes or ones that come in duo sets will not have engravings. For instance, my Serena Williams duo polishes did not come with any engravings on them. A lot of my newer OPIs from 2013 also do not seem to have these engravings, so perhaps it is a feature that's being phased out. EDIT: Reader Fluff-Anna from Sweden has also reported that her authentic, store-bought OPIs do not have the white engraved numbers, only the black stamped numbers, so it's possible that the numbers may vary from region to region.


Some retailers (even legitimate brick-and-mortar stores) will file the white numbers off the top of the bottle, which according to OPI they aren't supposed to do, but if you notice a little dent around the top of your bottle, that's likely what happened.

Fake OPIs are also known to have crooked or visibly shorter lids than genuine OPIs. Many fakes also have a visibly rougher texture on the top of the caps than genuine OPIs do. There should also be a small dot indentation on the "P" on the cap.
The inside of the cap should have ridges like a gear. EDIT: Thanks to Rachel for pointing out that DS polishes do NOT have gears inside the lid since they have silver tops, not the usual black ones. Black label OPIs also do not have the gears inside the caps.

The wand of the brush for genuine OPIs should have OPI imprinted on one side of the brush. You will likely have to wipe polish off the brush since it can be pretty faint. Apparently some of the fake bottles have this imprint as well, so you'll need to do some other tests to make sure you've got an authentic product. Older OPIs (pre-2006) also may not have this imprint.

I've also heard that some fake OPIs smell really terrible, since they're likely made with different chemicals from genuine OPIs, so that's something to look out for as well. Some fakes are easy to spot while others can be a bit trickier since manufacturers of fakes are becoming increasingly attentive to detail. Remember to always do your homework before purchasing and trust your gut!
Wednesday, August 17, 2011
How To Remove Glitter Polish--The Easy Way!
A little while back I showed you Milani FX Gems. While I love glitter polishes like this one, I used to wear them less than I would have liked because of what a royal pain they are to remove. Glitter polishes are notoriously gritty and tough to take off your nails. I always dreaded the long, annoying process of trying to wipe off all that stubborn glitter with a cotton ball. But thankfully I discovered the foil method on the Internet!
Here's how I removed my Milani FX Gems manicure. This will work with any glitter polish and save you from having to scrub all those sparkles off.

You will need:
Step 1: Cut five cotton rounds in half.

Step 2: Soak one cotton round in nail polish remover and then wrap it around your nail like so:

Step 3: Wrap a strip of aluminum foil around your finger to keep the cotton round in place and pressed up against your nail. Repeat steps two and three with the rest of your hand. It should look something like this when you're all done:

Step 4: Wait around five minutes. Read a book, go on the computer, watch TV or relax however you like. Once time is up, remove the foil and the cotton rounds. The wet cotton round will have absorbed the majority of the glitter. If you still have a few glitter pieces here and there on your nail, it should easily rub right off.
Step 5: Rinse your hands to remove all the acetone and then moisturize your nails right after. Exposing them to acetone for this long WILL dry them out, so use this method with care and make sure not to skip this last step!
Here's how I removed my Milani FX Gems manicure. This will work with any glitter polish and save you from having to scrub all those sparkles off.

You will need:
- Nail polish remover (preferably acetone-based, but if you have dry nails, you should probably stick to acetone-free)
- Cotton rounds
- Scissors
- Aluminum foil
- Cuticle moisturizer
Step 1: Cut five cotton rounds in half.

Step 2: Soak one cotton round in nail polish remover and then wrap it around your nail like so:

Step 3: Wrap a strip of aluminum foil around your finger to keep the cotton round in place and pressed up against your nail. Repeat steps two and three with the rest of your hand. It should look something like this when you're all done:
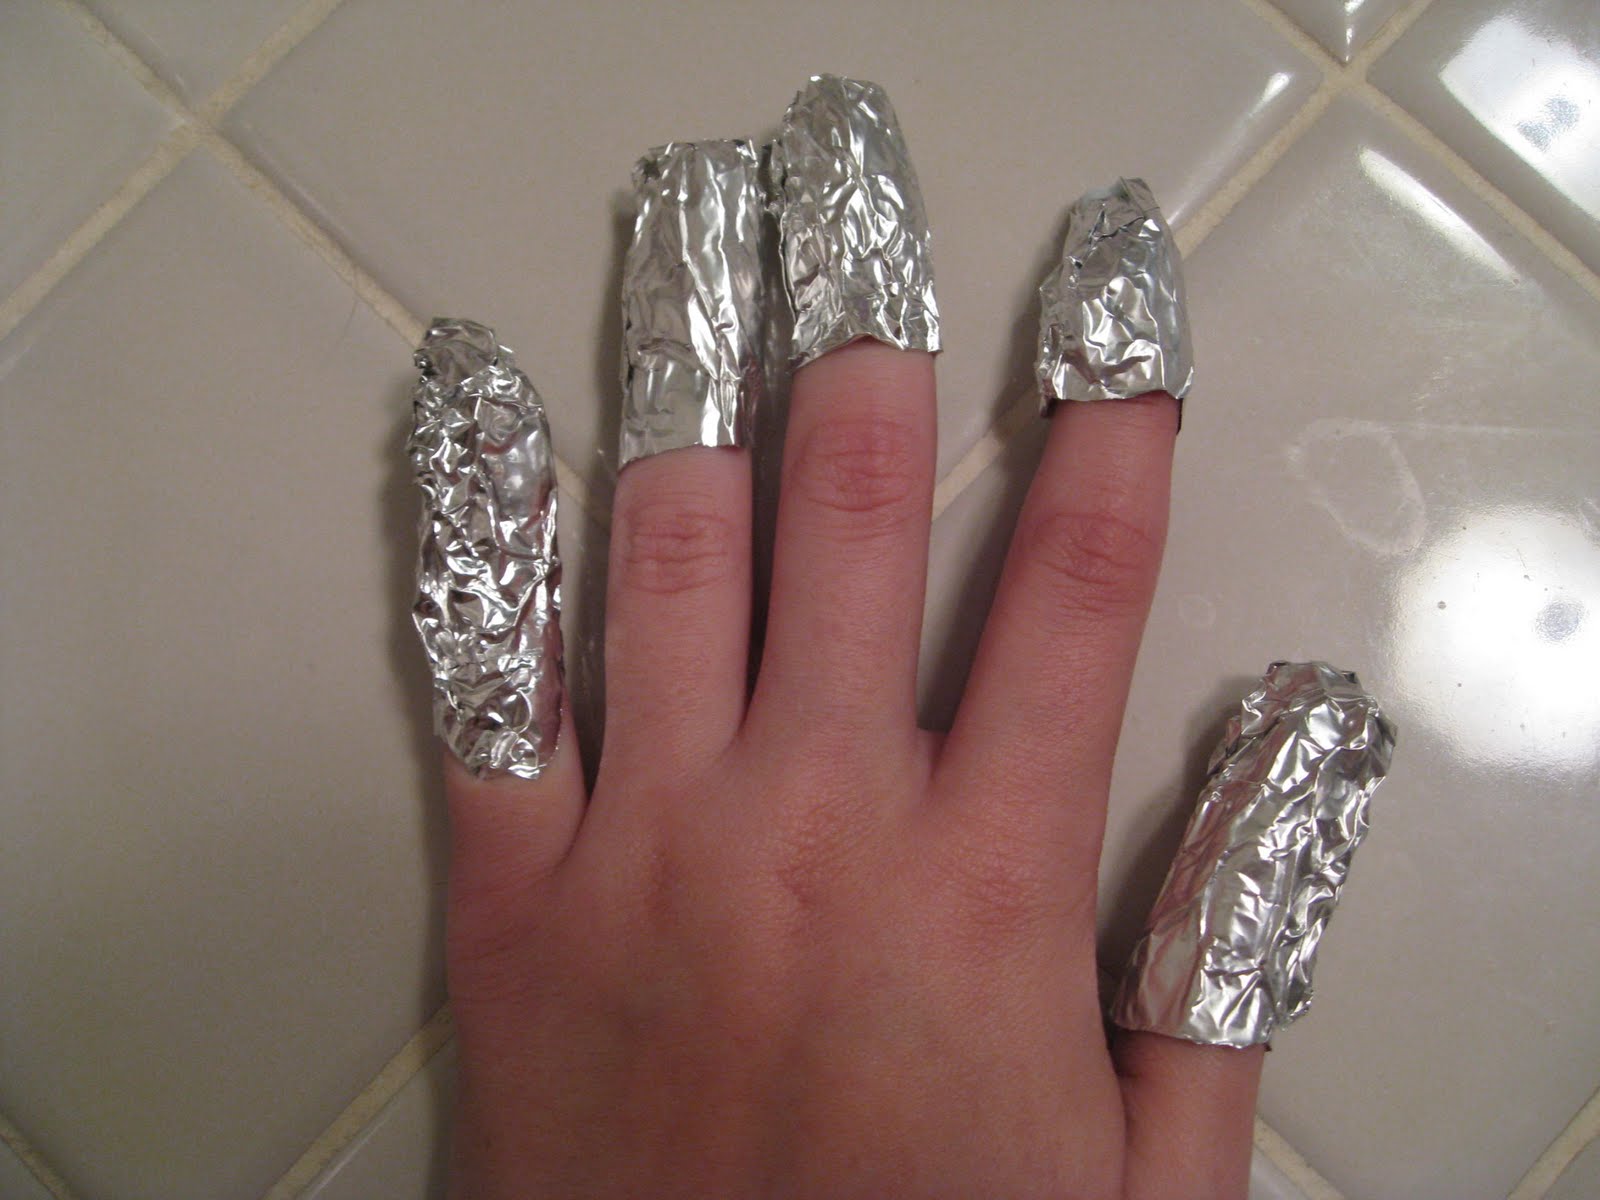
Step 4: Wait around five minutes. Read a book, go on the computer, watch TV or relax however you like. Once time is up, remove the foil and the cotton rounds. The wet cotton round will have absorbed the majority of the glitter. If you still have a few glitter pieces here and there on your nail, it should easily rub right off.
Step 5: Rinse your hands to remove all the acetone and then moisturize your nails right after. Exposing them to acetone for this long WILL dry them out, so use this method with care and make sure not to skip this last step!
Monday, August 15, 2011
How To Strengthen Your Nails
This post is in response to a particular reader (Hi out there!) who wrote me this request: "Can you put something on your blog about hardening your nails please? Mine always break."
At the drugstore, you probably see lots of topcoats and nail treatments claiming to harden your nails, but there are plenty of easy-and mostly free-ways to keep your nails strong without them!
 Tip 1: MOISTURIZE. This is a big one. Your nails need the proper amount of moisture, just like your skin does. Most nails break or crack because they are dry and brittle. Keep a nail or cuticle moisturizer in your purse and use it throughout the day and especially after you use nail polish remover (see Tip 3). My personal favorite is Smith's Rosebud Salve, since you can also use it on your lips too and Burt's Bees makes a great cuticle cream as well.
 Tip 2: Don't pull off hangnails or cuticles. When you do this, you are most likely ripping living tissue too. Instead of tearing off a hangnail, use a pair of nail scissors or other small clippers to remove the loose piece and keep the rest of your nail tissue intact. Biting your nails can be also just as bad as picking at them, since you're spreading bacteria from your mouth to your nails.
 Tip 3: Use nail polish remover with care. Many nail polish removers contain acetone, which is extremely drying to your nails. If you have brittle nails, avoid acetone-based removers, or if you choose to use a remover with acetone (they are great for getting off glitter polish in particular), rinse your hands as soon as all of your polish is off in order to minimize your nails' contact with the acetone. Ideally, you should only use nail polish remover one or two times per week. (Although if you're like me and love changing your polish, this really is not possible!)
 Tip 4: Keep your nails short. Shorter nails are obviously less prone to breaking. It's best to clip your nails right after a bath or shower, as the hot water will have softened them up. If you want to keep a bit more length to your nails, use a file to create a clean, rounded line on areas where you notice breakages, splits or brittleness. This way you can minimize overall damage while still maximizing your nail length.
 Tip 5: Don't use your nails as tools. This should be a no-brainer, but using them to peel off stickers, break seals, scrape surfaces, etc. will only weaken your nails.

Tip 6: Try a home remedy. One of the most popular is soaking your nails in lemon juice, either from a bottle or directly from the fruit itself. Submerge your fingernails entirely in a bowl of lemon juice and let them soak for around fifteen minutes. Keep this up regularly, as your nails will absorb the minerals in the lemon juice, allowing the proteins and keratin in your nails to grow stronger and faster. You can also try brushing on olive oil to help keep your nails moisturized.
Tip 7: For severe cases, consult your doctor. Nails are a good indication of your overall health, so if yours are naturally very brittle, jagged, yellow or otherwise abnormal, bring it up next time you see your doctor. They can tell you whether it's a quick fix or the sign of an underlying issue like infection or a vitamin deficiency.
At the drugstore, you probably see lots of topcoats and nail treatments claiming to harden your nails, but there are plenty of easy-and mostly free-ways to keep your nails strong without them!


Tip 6: Try a home remedy. One of the most popular is soaking your nails in lemon juice, either from a bottle or directly from the fruit itself. Submerge your fingernails entirely in a bowl of lemon juice and let them soak for around fifteen minutes. Keep this up regularly, as your nails will absorb the minerals in the lemon juice, allowing the proteins and keratin in your nails to grow stronger and faster. You can also try brushing on olive oil to help keep your nails moisturized.
Tip 7: For severe cases, consult your doctor. Nails are a good indication of your overall health, so if yours are naturally very brittle, jagged, yellow or otherwise abnormal, bring it up next time you see your doctor. They can tell you whether it's a quick fix or the sign of an underlying issue like infection or a vitamin deficiency.
Saturday, August 13, 2011
How To Whiten Your Nails
As much as I love nail polish, there are definitely times when it can stain or yellow your nails, either from using a dark shade or applying and removing polish very often. So here is an easy way to help make your nails look cleaner and whiter in between manicures!

You will need:

I know this looks like we're about to go all "Breaking Bad" here or something, but don't worry, it's harmless! :) Since hydrogen peroxide is primarily used as an antiseptic, it won't hurt your nails or skin. However, you can substitute lemon juice if you prefer.
Step 2: Using the cotton swabs, spread the paste over your nails. Make sure you get under your tips as well. If you have trouble getting under the nail, try using an old toothbrush.
Step 3: Wait three to five minutes.
Step 4: Rinse off the paste with warm water. Be sure to get it all out from under your nails too, otherwise the remaining paste will start to itch after a while.
Step 5: Generously coat each nail with your moisturizer to help fight off any dryness, irritation or brittleness.

You will need:
- 3% Hydrogen peroxide (This can be found at most drug or grocery stores for around 90 cents. It's also great for removing stains on light fabric and as an anticeptic.)
- Baking soda
- A plate (or other mixing surface)
- Cotton swabs
- A spoon
- Cuticle moisturizer of your choice (Here I am using Smith's Rosebud Salve, which I also like for dry lips and hands.)

I know this looks like we're about to go all "Breaking Bad" here or something, but don't worry, it's harmless! :) Since hydrogen peroxide is primarily used as an antiseptic, it won't hurt your nails or skin. However, you can substitute lemon juice if you prefer.
Step 2: Using the cotton swabs, spread the paste over your nails. Make sure you get under your tips as well. If you have trouble getting under the nail, try using an old toothbrush.
Step 3: Wait three to five minutes.
Step 4: Rinse off the paste with warm water. Be sure to get it all out from under your nails too, otherwise the remaining paste will start to itch after a while.
Step 5: Generously coat each nail with your moisturizer to help fight off any dryness, irritation or brittleness.
Subscribe to:
Posts (Atom)